FIELD & FOREST

winter

beans with garlic, rosemary, and aleppo pepper

dinner, lunch, vegan, vegetarian, winter, autumnRachel SandersComment

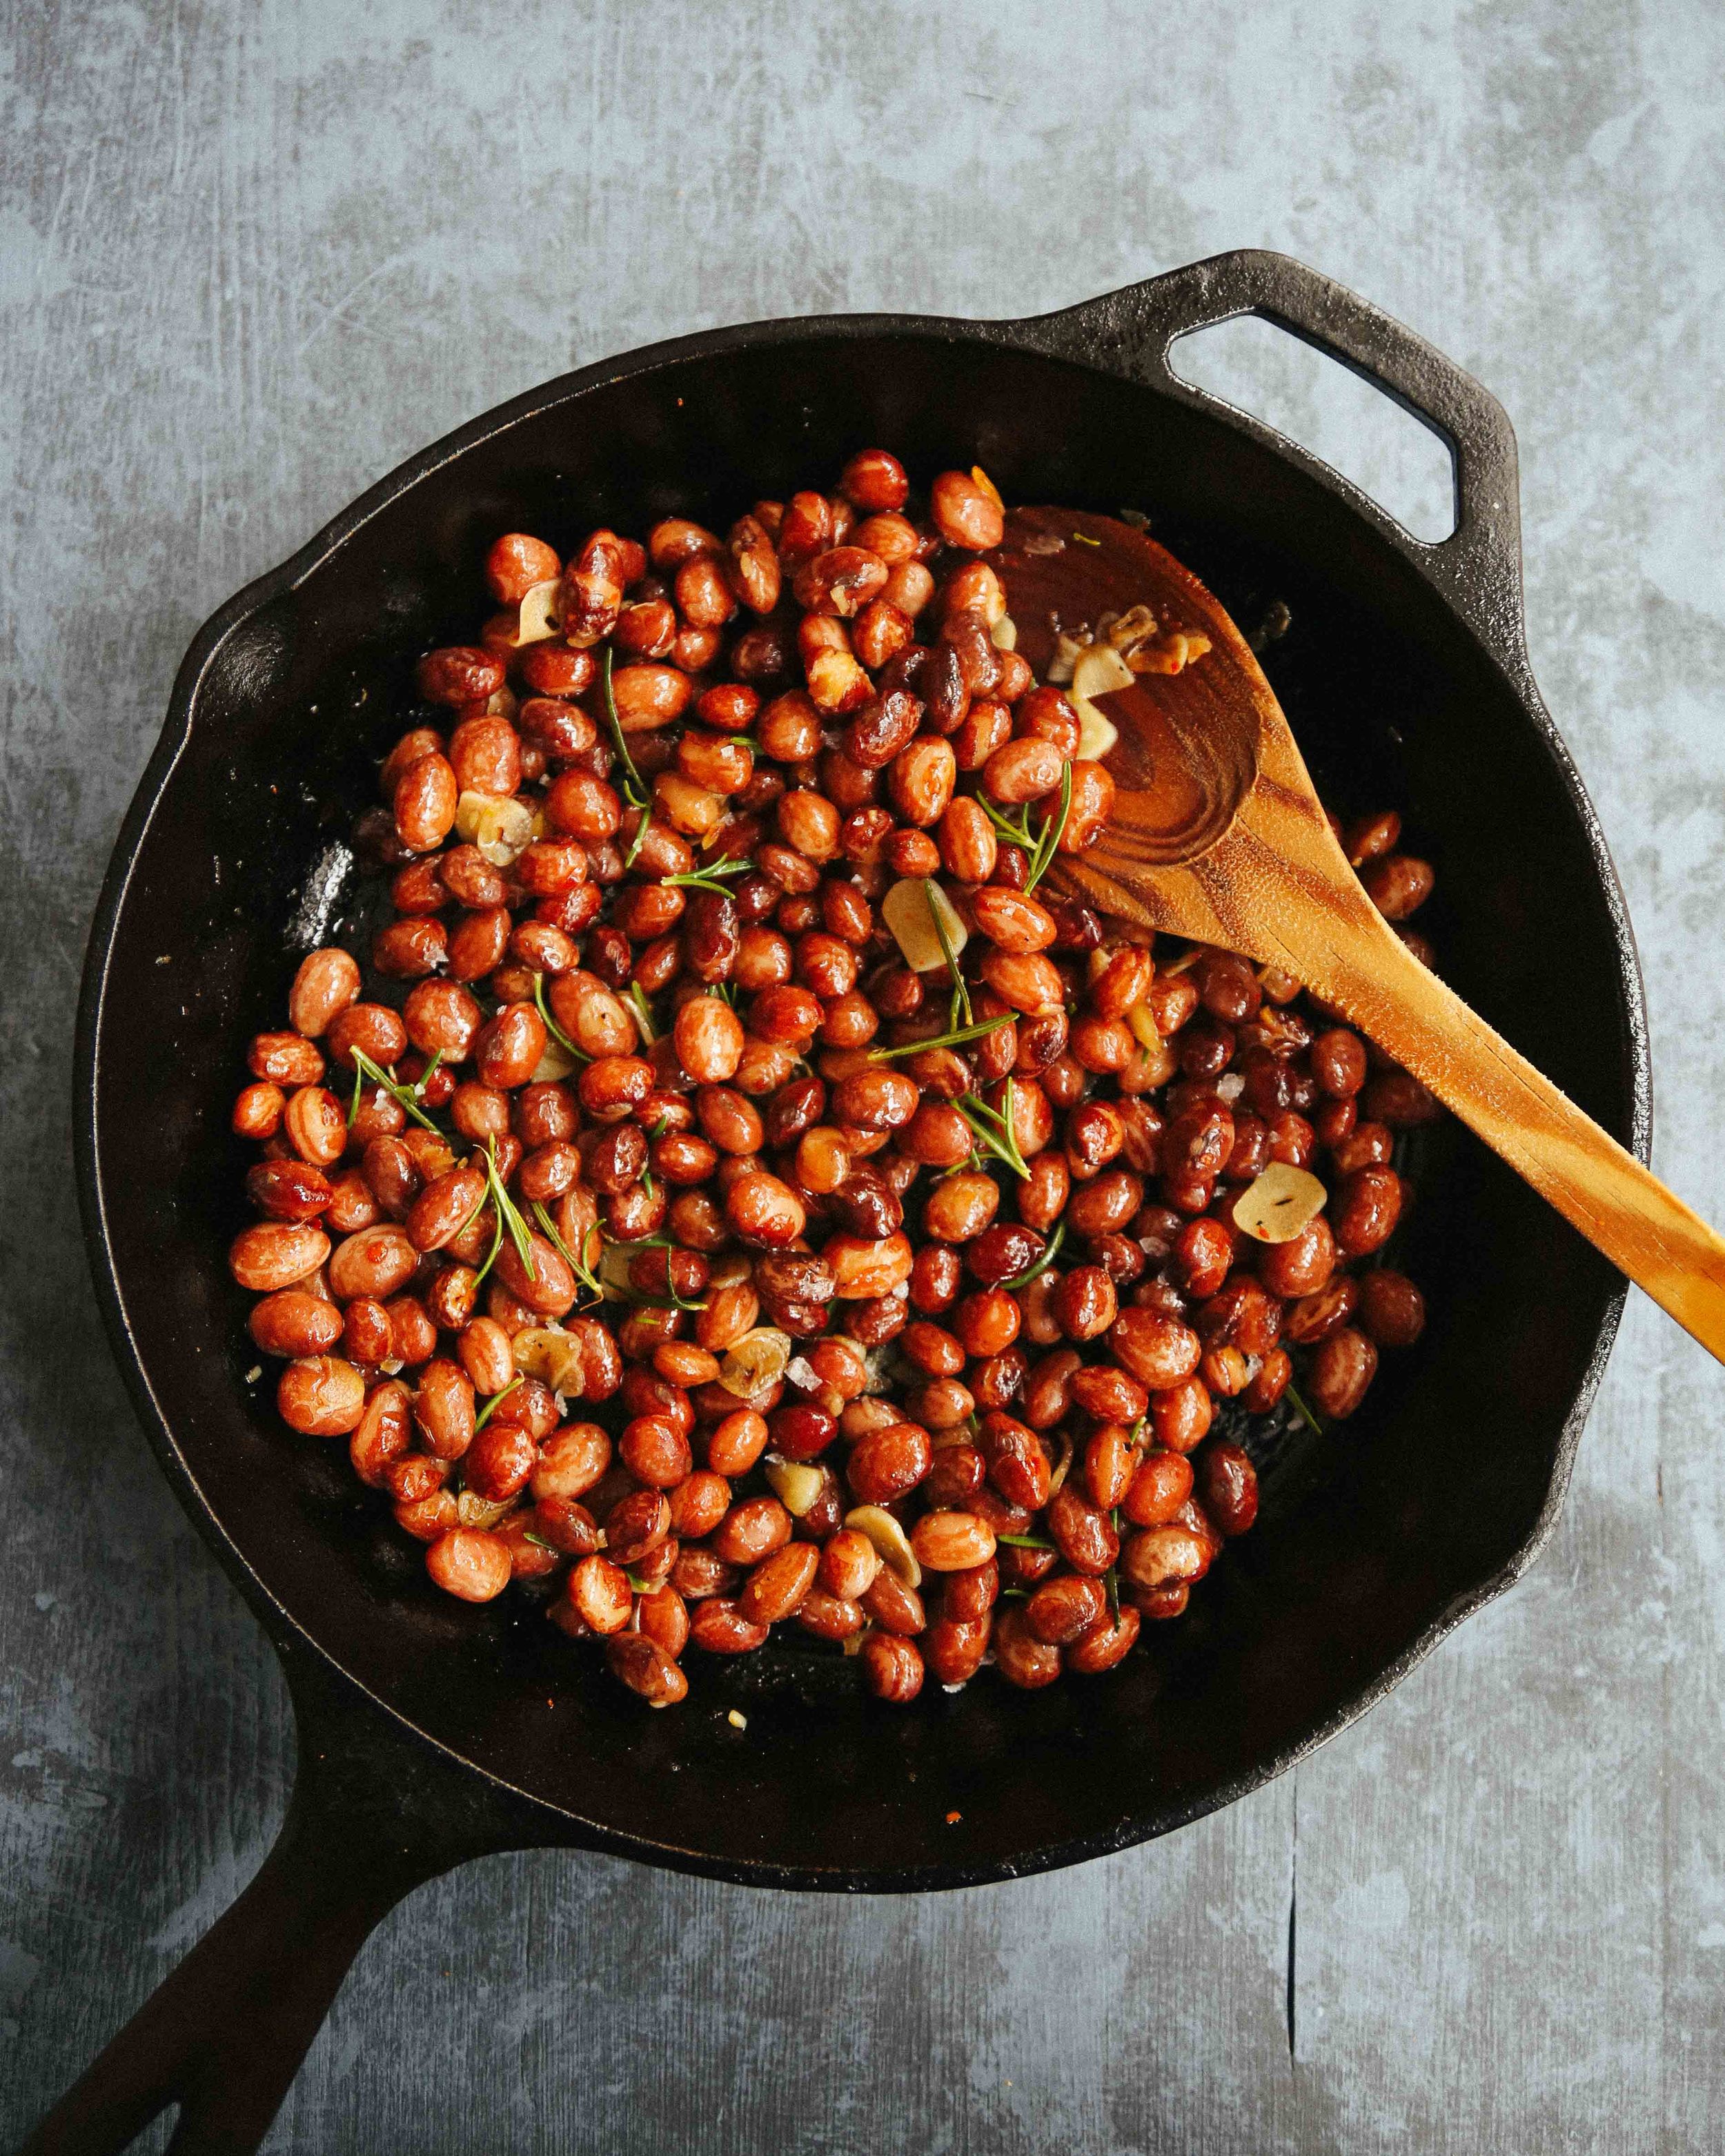
Gah, my mouth starts watering whenever I think of these beans. These look innocuous, but they are heady with garlic and deeply savory with rosemary and pepper flakes. I sometimes can't believe how good they are considering that they're made with things that are usually just lying around! Pure magic.

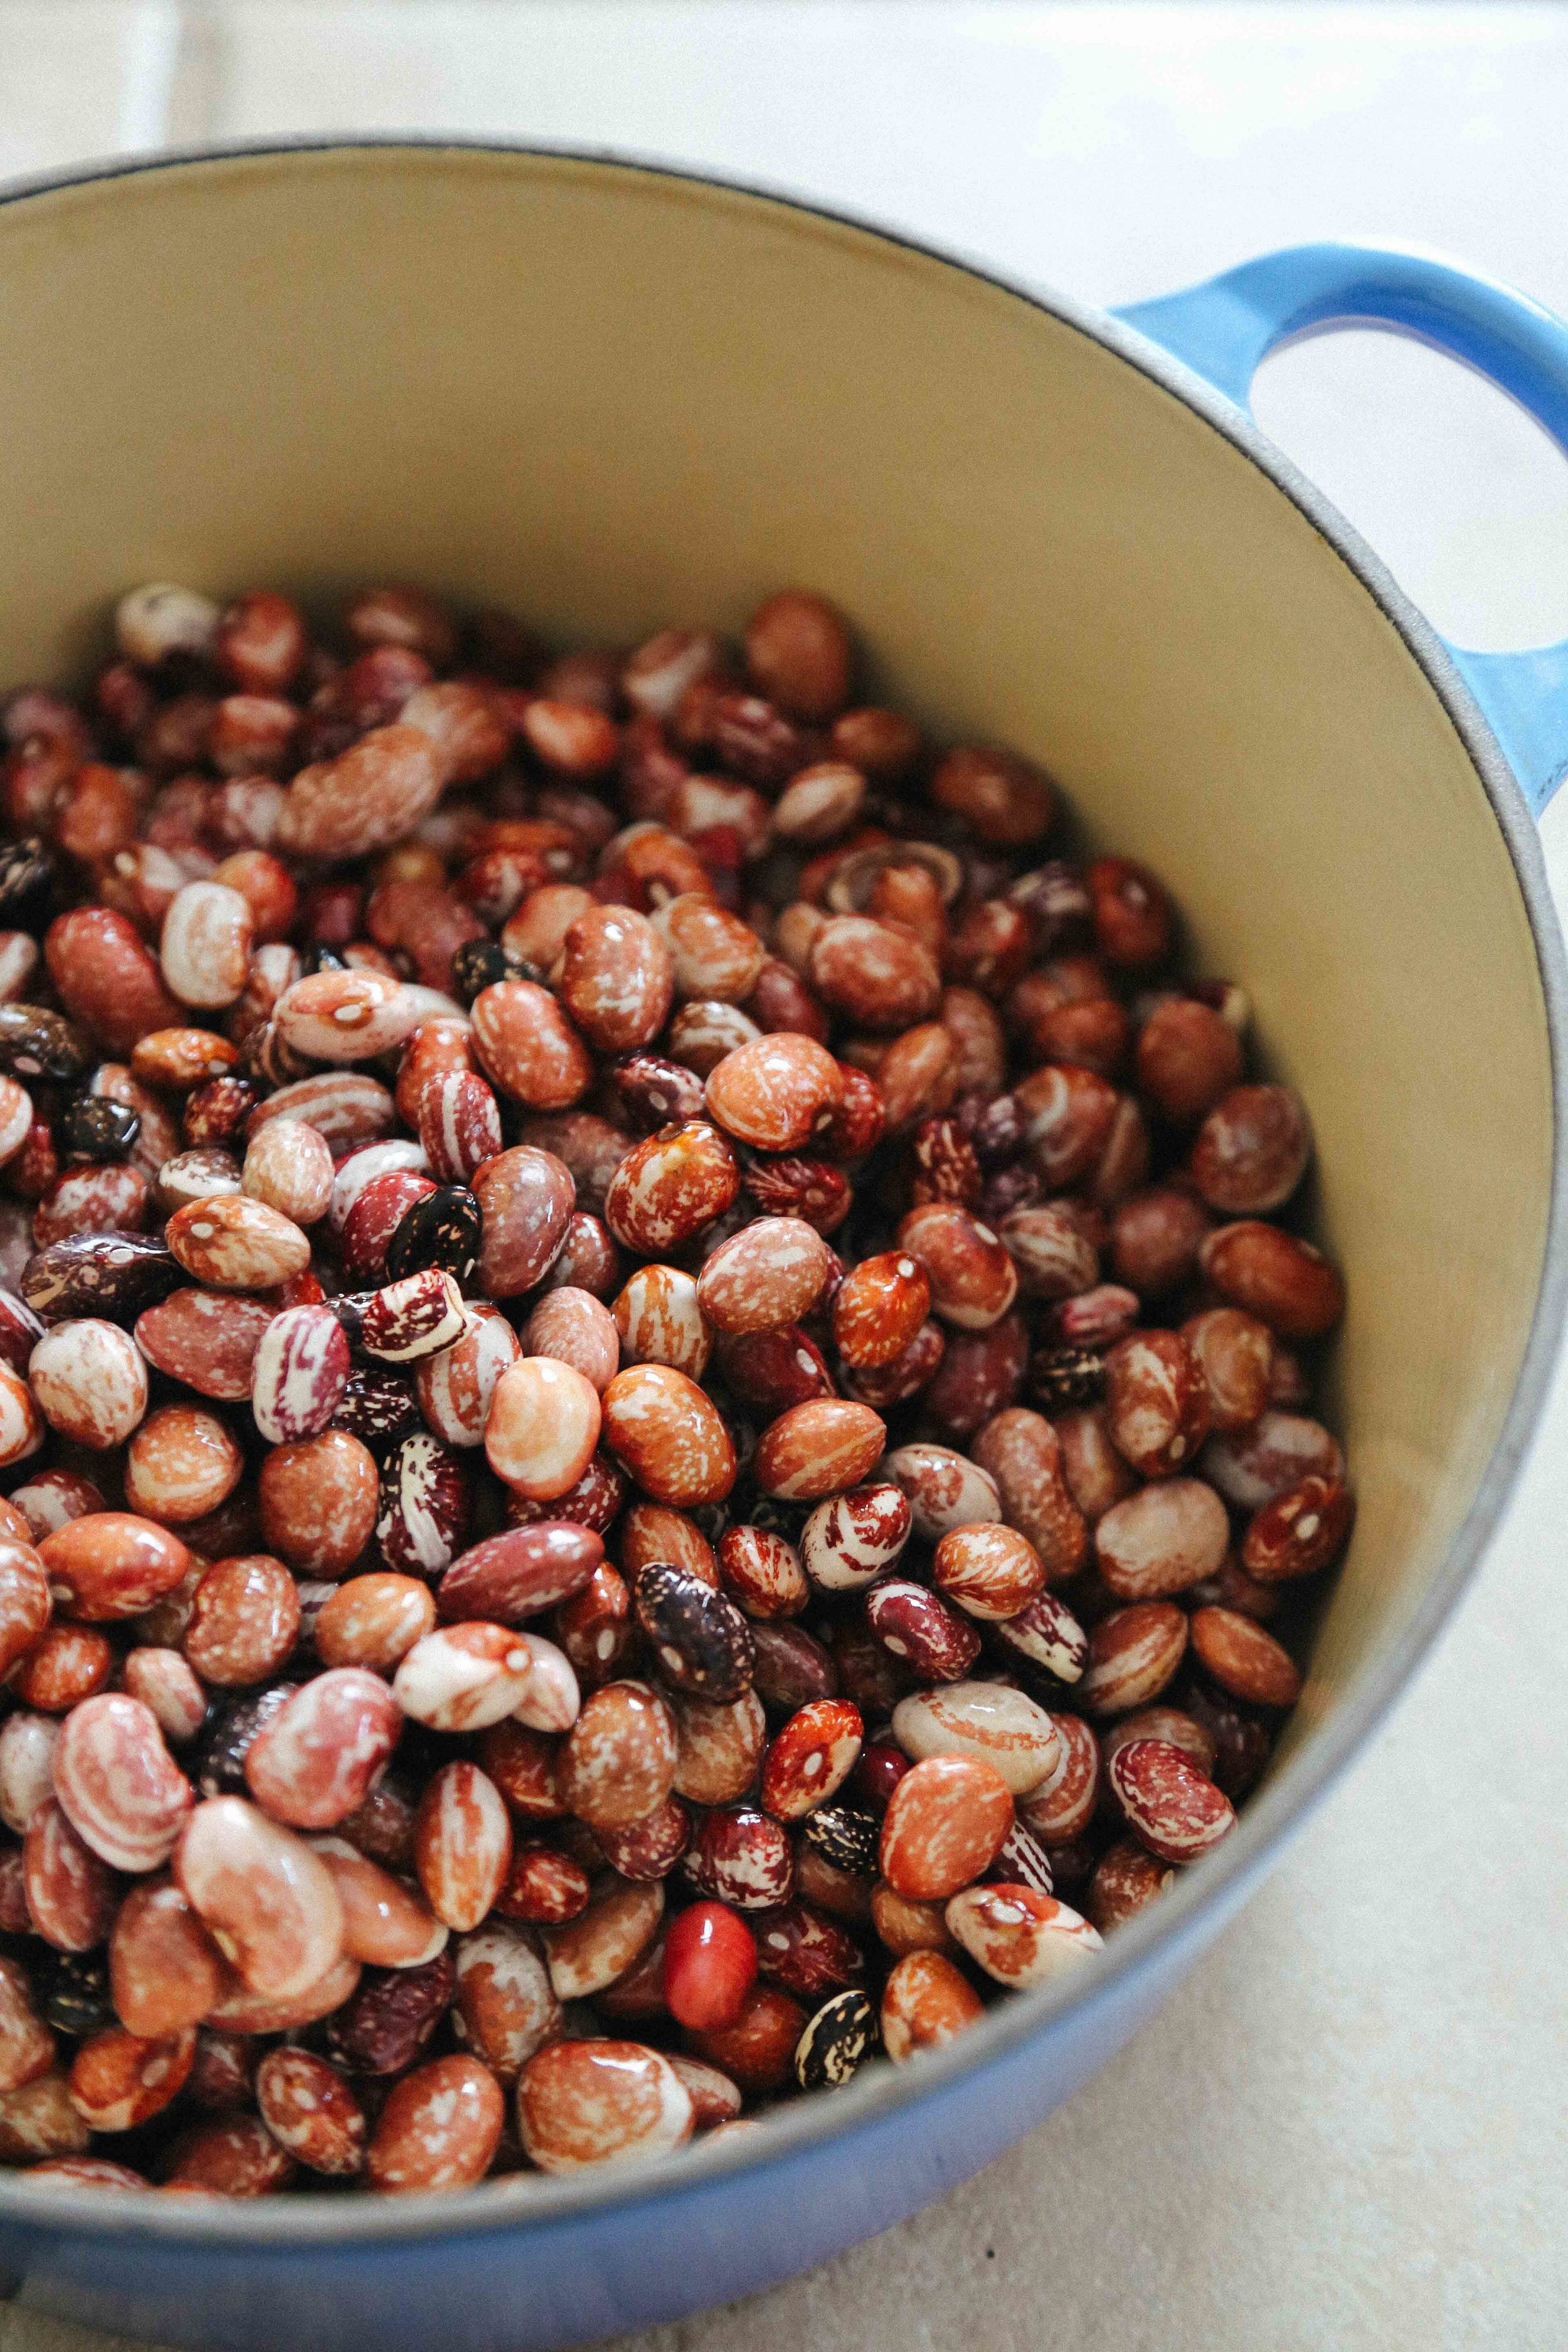
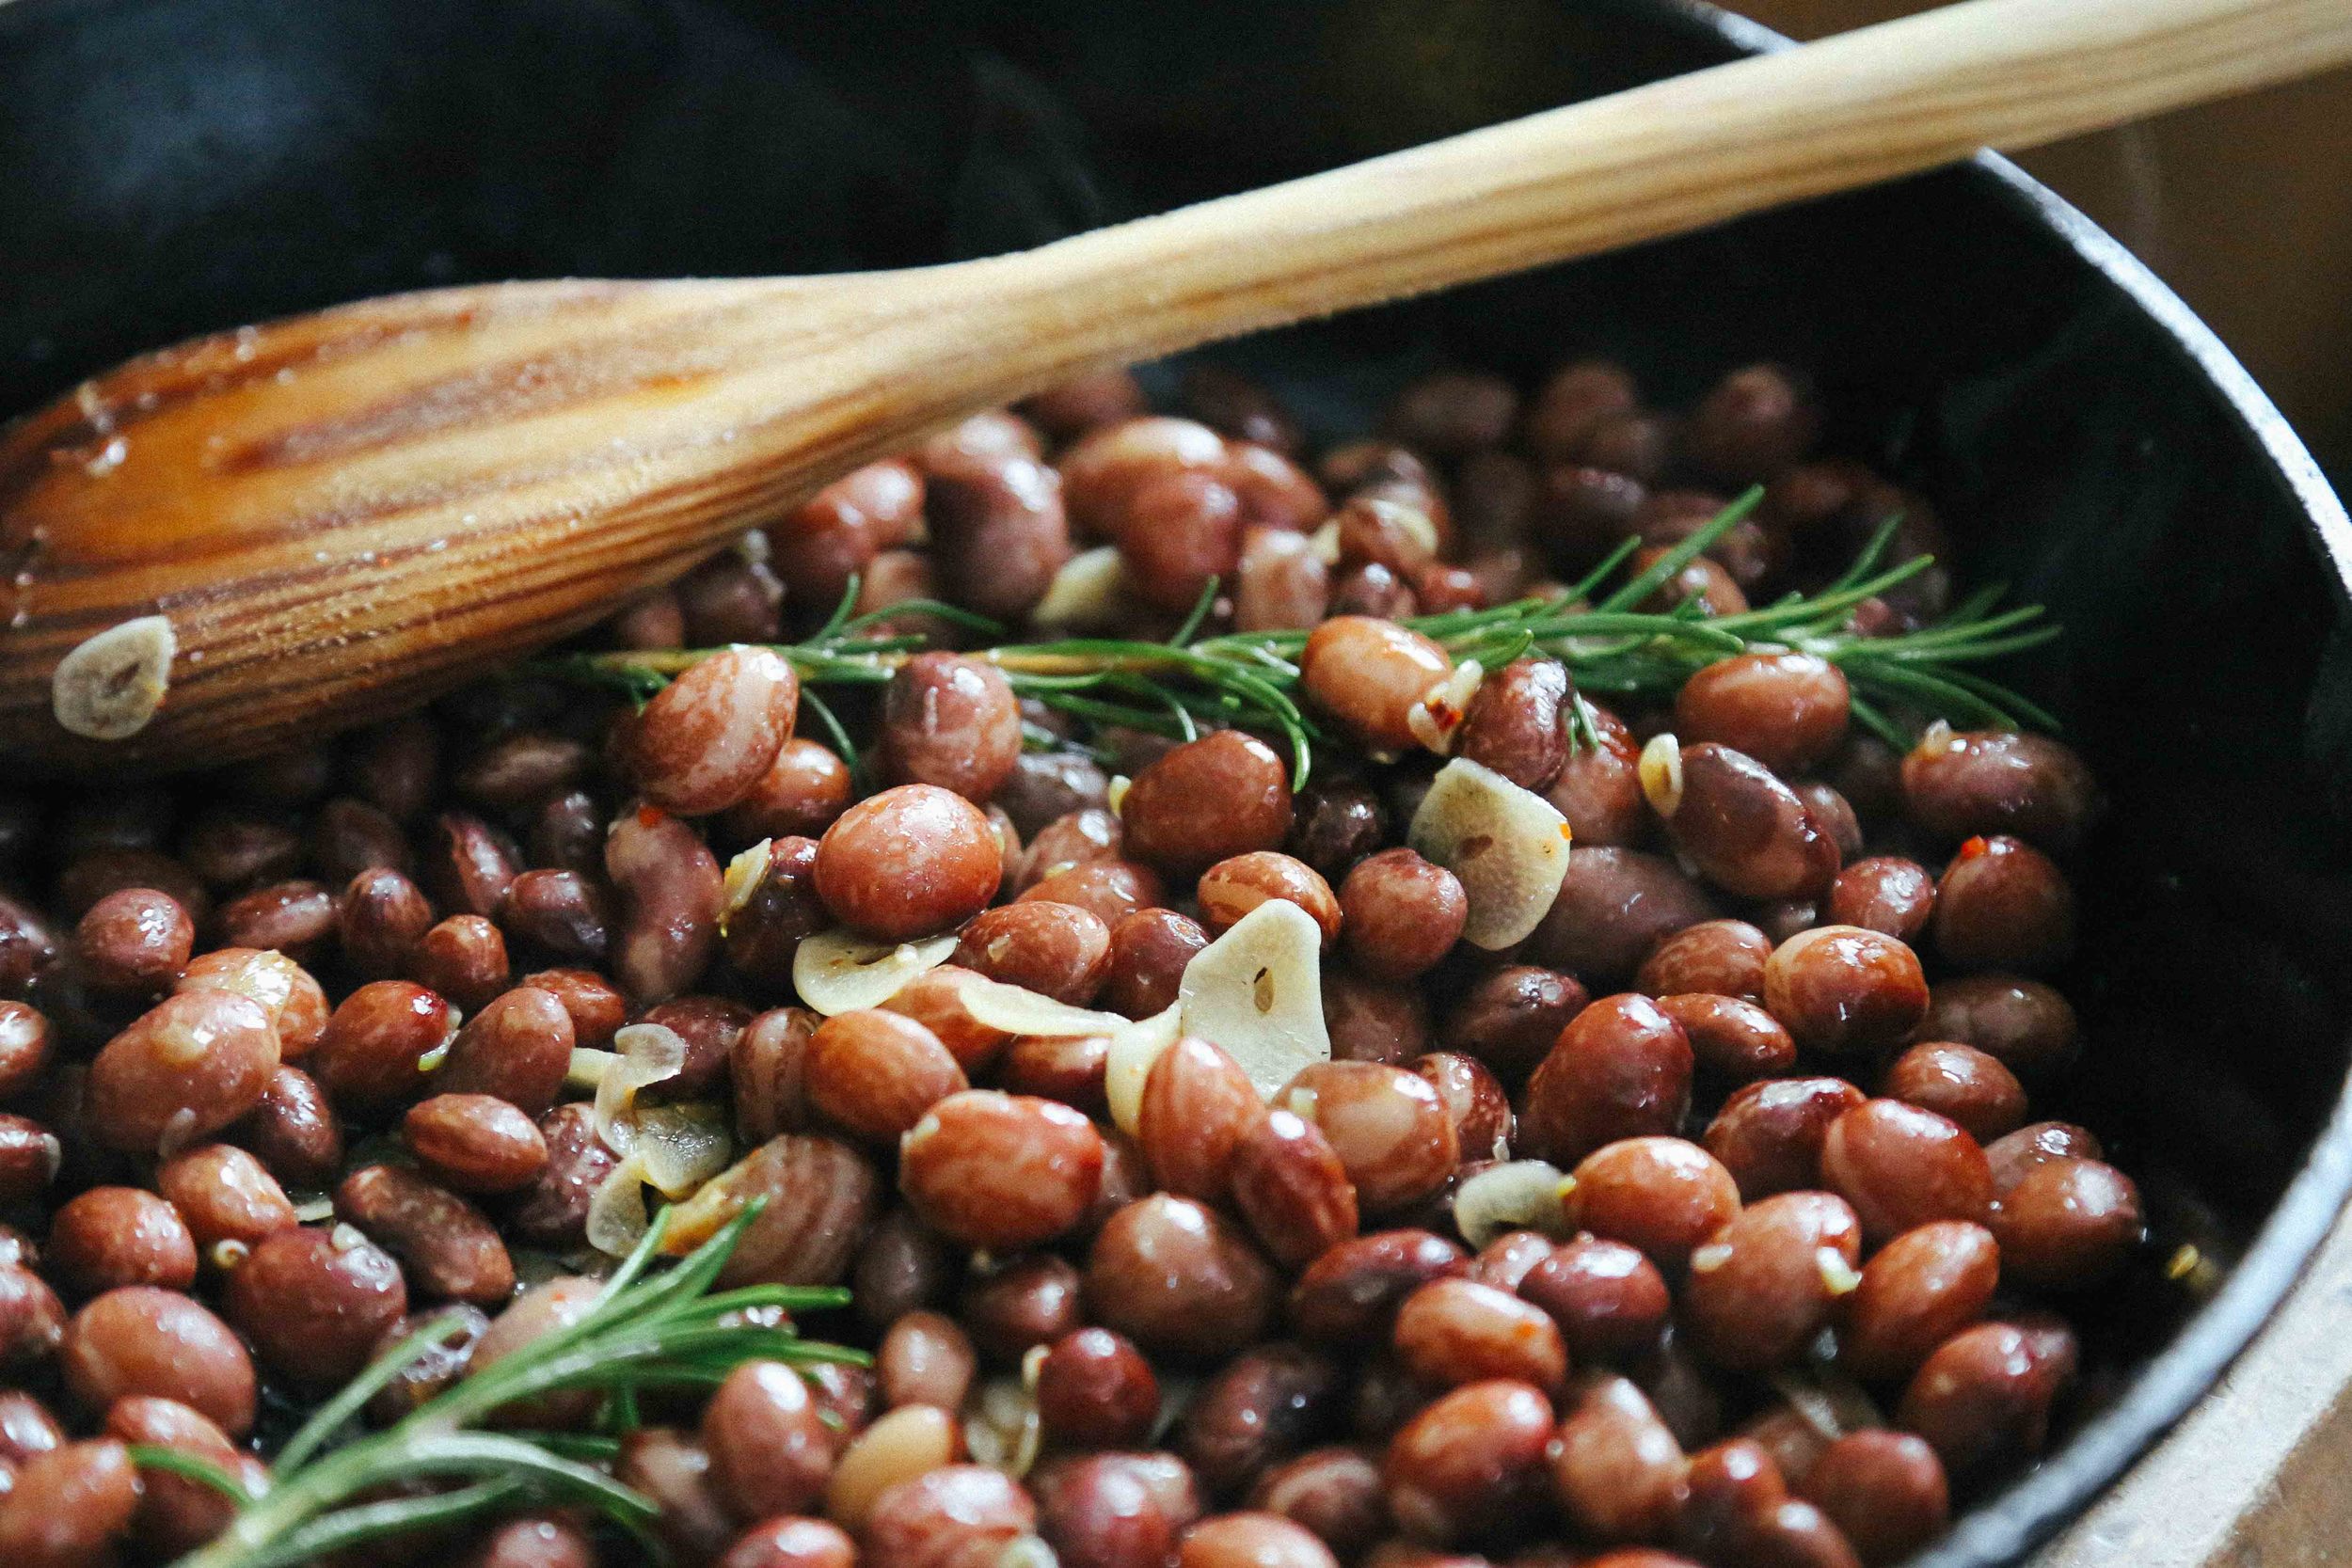
The beans pictured here are Good Mother Stallard beans from Rancho Gordo. I love how these beans plump up when you cook them and how densely creamy they are on the inside, but you can make this with any cooked beans or canned beans you have around. You could simply add them to the oil with the garlic and cook until they're heated through, but I like taking them a little further so that some become golden and a little crispy on the outside. That's when things really start to get good.

After that, you can remove them from the heat and serve them straight from the pan as is, or give them another pinch of flaky salt and a squeeze of lemon for a bit of a lift (which is highly recommended!). If you can't stop eating them, then you know you've achieved perfection.

serves 2-4 as a side

This recipe easily scales up, but I wouldn't bother scaling it down, as the beans make fantastic leftovers when added to pasta or salads, or served with eggs. You can even make a slice of toast, top it with a few slices of avocado, add the beans and a fried egg and have a very respectable breakfast or brunch dish.

How to simply cook dried beans: place your beans in a large bowl and soak them overnight in plenty of cold water. Drain and rinse your beans to remove any grit, and put them in a large pot with plenty of cold water and a single bay leaf. Bring the water and beans to a boil, reduce heat to low, and cover, cooking until the beans are no longer mealy and taste creamy, but not so long that they turn to mush (I start checking my beans 30-45 minutes after they started cooking, but the timing can vary greatly depending on the age of your beans). Once the beans are cooked, remove from heat, uncover, and let cool in their cooking water (this helps to keep them intact). Use immediately or refrigerate until ready to use.


1/2 pound Good Mother Stallard beans (or other beans that hold their shape once cooked), cooked, OR 2 cans cannellini beans
A generous glug (two tablespoons) olive oil
6-8 cloves garlic (or more, no need to limit yourself!), thinly sliced
2 large sprigs fresh rosemary
1 large pinch aleppo pepper flakes OR 1 small pinch standard red pepper flakes
Flaky salt, to taste
Lemon juice, to taste


In a large, heavy-bottomed skillet, heat the olive oil over medium-low heat until it begins to shimmer and can easily be swirled around the pan. Add the garlic and cook, stirring constantly, for about 30 seconds or until it begins to turn translucent and smells really, really good (don't let it brown here). Add the pepper flakes and rosemary, cook (stirring) for a few more seconds, and then add the beans. Stir everything together, raise heat to medium, and then let cook, stirring occasionally, until the beans are heated through, the garlic is turning golden, and a few of the beans are beginning to turn crispy.

Remove from the heat, strip the leaves from the rosemary, and stir the leaves back into the beans. Finish with a generous pinch of flaky salt and a good squeeze of lemon, and serve immediately.


Note that if you use canned beans, you may have to stir them more gently while cooking, as canned beans have a greater tendency to fall apart when cooked in this way. But beans that have fallen apart make excellent bean mash, which is a lovely thing on its own, so it's not any tragedy should this happen to you.

ruined cake parfaits

breakfast, desserts, sweet, vegetarian, winterRachel SandersComment

Good grief, did this holiday season kick anyone else in the pants? I realize we're more than halfway into January (how did that even happen?!) and have gotten back into the swing of reality, but all I really want to do is have a solid lie-down and binge watch The Great British Baking Show in my pajamas.

I suppose our holiday break got off to a bad start when our car broke down (at 1:30am, on a dirt/mountain road, in a storm), and was punctuated by various unforeseen events (including more car trouble) through the New Year. I mean, really, everything was okay in the grand scheme of things (and the car trouble meant we were able to have more time with family), but it felt like each day something made us say, "WHOA, okay... guess we're dealing with this, now." We're both still reeling a bit.

And then last week, on a day when I really needed things to go right, I baked a cake.

And it SUCKED.

It stuck to the pan, the top came out strangely tough while the inside was quite delicate and almost under-baked, it didn't rise the way I expected... blah. It has been a while since I've adapted a cake recipe, and I had forgotten how devastating it can feel to put a lot of time and effort and care into making a cake and have it not turn out the way you want. Granted, I did mess around with the recipe quite a bit, but in a way that I honestly thought would turn out okay, if not extremely well. That probably sounds arrogant, but CLEARLY I WAS WRONG ANYWAY.

Phoo.

So, when we bake a cake and it turns out wrong, what do we do? Do we cry (maybe), do we eat a lot of the part that was stuck to the pan (probably), or do we find a way to remedy the situation (um, sure?)?

Some ways have already been devised to rescue weird cakes (remember cakepops?), but usually when I am making a cake, it is because it is a celebration or special event of some kind, and I want to make something a little more special or fancy. It also usually means that I am cooking other things, and I don't have the time or wherewithal or emotional capacity to deal with stuff like tempering chocolate and finding skewers or popsicle sticks.

No time like the present to break out a good old parfait.

A parfait is, in its most elemental form, layers of cake or cookies, whipped cream, and fruit. Sometimes the cream has other things going on with it, like mascarpone or creme fraîche whipped in (or maybe a wee bit of booze). I personally like my whipped cream tempered with yogurt in a 1:1 ratio. It is just rich enough for dessert, but still feels quite light and has a pleasantly subtle tang; you could serve it for breakfast and nobody would say boo.

So next time you plan to make a cake, on the off-chance it decides to be temperamental, grab a pint of cream, a container of yogurt, and some fruit just in case you need to perform some parfait magic, and no one will EVER know that your cake was a near-disaster. Unless, of course, you write a blog post about it later.

(Also, Richard and I agree that we like this so much that we'd make it again with a not-ugly cake, too! Though I may save at least the next good cake for something else, if only for my ego's sake.)

ruined cake parfaits

serves 6

You can scale this recipe up or down quite easily, depending on the number of people you want to serve; just keep the 1:1 cream to yogurt ratio.

I was testing out a recipe for a sesame cake when I made these parfaits, and decided to use cara-cara oranges and lime zest to go with the sesame flavor. The combination was out-of-this-world good, and I'll be sure to share the recipe for the sesame cake once I get it dialed. Serve this cream with any cake you like, and with any fruit you like, but here's a quick thought regarding chocolate cake - I'd actually replace the yogurt in the cream with mascarpone, as I think it would taste better to have something slightly richer and less tangy to go with the chocolate.


1 cup full or low fat plain yogurt
1 cup heavy whipping cream
2-3 tablespoons sugar (optional)
1 teaspoon vanilla (optional)

1 cake, sliced or broken into bite-sized pieces
fresh fruit, cut into slices or chunks (reserve a few pieces for garnish)
lime/citrus zest (optional)


Whisk together the yogurt and cream in a large bowl. If the yogurt and cream are not straight-out-of-the-fridge cold, place the bowl into the fridge for 15-20 minutes to chill (it won't whip properly if it is not cold). In the bowl of a stand mixer fitted with a whisk attachment or with a hand whisk, beat the yogurt/cream until soft peaks form. Continue beating for a few more seconds to stiffen the mixture, but keep it somewhat billowy and soft (it will look prettier and be easier to layer).

Layer the cake, cream, and fruit in individual glass jars or wine glasses, beginning with the cake and ending with the cream. Garnish each parfait with a piece of fruit and some fresh citrus zest, if desired. Refrigerate until ready to serve

mayan chocolate roll-out cookies

sweet, vegetarian, winter, autumn, dessertsRachel Sanders4 Comments

Posting a cookie recipe around the holidays always feels like risky business because most folks interested in baking and general merry-making seem to have figured out their cookie game plan. So you should feel like you can take or leave this recipe, but I would encourage you to take it if you have a spare evening and some butter lying around. It is a solid chocolate roll-out dough recipe, and you can leave out the chili powder and cinnamon bells and whistles if that feels like too much for you. But to quote a good friend, the "latent, lingering heat [of the spices] is so pleasing." Sort of like liquid jacket, but with cookies.

I've got your attention now, haven't I? ;-)

If you're new to the business of royal icing, here are some of handy tips for decorating your cookies with maximum enjoyment and minimal frustration:

1. Invest in a piping tip - you have probably seen people ice cookies using a sandwich bag with the end snipped off, but it is difficult to guarantee that you'll be able to pipe in a straight line and that the thickness of your line will be consistent (since the opening may stretch or tear). You'll more likely set yourself up for a frustrating time if you refuse to use a piping tip or other, rigid tip (such as that of a squeeze bottle, which has its own limitations). I put a piping tip into a sandwich bag so that I could seal the bag and save the icing from drying so that it could be used over multiple days. Find icing tips at gourmet specialty shops (such as Sur la Table) or online. I like using a plain, round tip (such as an Ateco #2 or #4) for royal icing since I make mine somewhat fluid and it won't hold textures or ridges.

2. Move your piping tip at the same speed as the icing flows - moving at the same speed means that you're more likely to create straight lines, and that your lines will be the same thickness as the piping tip. Move too quickly, and you'll create thin lines (or your lines might break as you pipe them). Move too slowly, and you may end up with thicker or clumpy sections in your lines, or your lines may look more wobbly. Practice on a few cookies or on parchment paper to get a feel for your icing's consistency/flow rate.

3. Work from the outside in whenever possible - this helps to ensure consistency in your design and makes it a lot easier to create "perfect" looking cookies.

4. Practice, and don't beat yourself up while you're learning! The point is to have fun with this. Worst case, you can always dump sprinkles on your funkiest designs and they will look fabulous.

mayan chocolate roll-out cookies

adapted from this recipe - makes roughly 3 dozen 3.5 inch cookies

This recipe is a little different from some in that some of the dry ingredients are mixed in with the wet ones before the flour is added. I found that I liked being able to beat the hell out of the batter when adding the cocoa powder without worry of gluten development from flour, so I am a big fan of this method for this particular recipe. If you choose to whisk the spices/baking powder/cocoa powder into the flour, then just continue with the "add the flour in three additions" part of the recipe, and be careful not to overmix your dough.

Also, I used the smaller amounts of spices when making this dough the first time, and while they added a really delightful something to the dough, I also like using them in slightly larger quantities to pack more of a punch.


1 cup butter, at room temperature
1 1/4 cups sugar
2 eggs
1 teaspoon vanilla
3/4 teaspoon baking powder
3/4-1 teaspoon chili powder (I used Rancho Gordo)
1/2-3/4 teaspoon cinnamon
1 teaspoon kosher salt
2/3 cup natural cocoa powder
3 cups all-purpose flour

Royal Icing, to decorate (recipe follows)


Cream together the butter and sugar in the bowl of a stand mixer until light and fluffy. Add the eggs one at a time and mix to combine, scraping down the sides of the bowl with a spatula in between each egg. Add the vanilla, and mix to combine.

Whisk together the baking powder, chili powder, cinnamon, and kosher salt, and add to the bowl. Mix well to combine, scraping down the sides of the bowl if necessary. Add the cocoa powder and again mix well to combine (I just left my mixer running for 2-3 minutes at this point).

Add the flour in three additions, scraping down the sides of the bowl and mixing just to combine in between each addition. Do not overmix. Form the dough into a round and wrap in plastic wrap. Chill in the refrigerator for at least 30 minutes or overnight.

While the dough chills, preheat your oven to 350˚F. Line two baking sheets with parchment paper.

Remove the dough from the fridge and divide in half. Place one half on a floured surface, and wrap the second in the plastic while you work with the first. Roll out into a 1/4-inch thick sheet (if the dough cracks or is hard to work with, let it rest for 15-20 minutes to warm up a bit). Cut into desired shapes and place on the parchment lined baking sheet. Once one baking sheet is full, place it in the oven to bake for 7-10 minutes while you cut more cookies.

Once the cookies are baked (I ended up liking the ones in the 8-9 minute bake range the best), remove them to a wire rack to cool (leave the parchment sheet on the pan for more cookies). Place the second pan in the oven to bake while you cut more cookies. Note: make sure to let the pans cool a little bit before putting unbaked cookies on them... this way they don't melt a little or lose their shape before making it to the oven. Reroll and cut any scraps. Repeat cutting/baking with the second round of dough once you've finished with the first.

Once cooled, cookies may be iced or stored in an airtight container at room temperature for up to a week.

ROYAL ICING
makes 1 cup

There are many different ways to make royal icing depending on whether you're using dehydrated egg whites, meringue powder, or fresh egg whites. I couldn't find dehydrated egg whites, and the meringue powder I found had a lot of funky-sounding additives, so I used a fresh egg white. The double-boiler method allows you to cook the egg white without making scrambled eggs and gives you a pure, white color.

If you can find pasteurized egg whites, Alton Brown has a great recipe here.


1 large egg white
1 cup powdered sugar, divided


Combine the egg white with 1/3 cup of powdered sugar in the bowl of a double-boiler (or in a heatproof bowl set over simmering water) and whisk to combine. Cook gently over the simmering water, whisking constantly, until the mixture reads 155˚F on a thermometer (do NOT stop whisking or let it boil). Remove from the heat and add the remaining powdered sugar, whisking constantly to combine until the sugar dissolves (briefly place it back over the heat if necessary to dissolve any lumps). Add a teaspoon or two of water if your icing seems too thick (I like to pick up a little icing with the whisk or a spoon and trail it over the surface - it should leave a ribbon, but be reabsorbed into the rest of the icing within 5 seconds or so).

pantry flatbread with arugula and aleppo pepper

autumn, breads, breakfast, dinner, lunch, main dishes, snacks, spring, winterRachel SandersComment

In the beginning of many cookbooks, there is a chapter with no pictures where the chef/author talks about the foods they like to keep on hand at any given time, how to stock a pantry properly, etc. Sometimes they'll go over unique ingredients - what they are, where to find them, why you should use them - or pieces of equipment that they can't live without that they've added to their finely curated list of kitchen gadgetry. Or maybe they'll talk a bit about their process - how they clean as they cook, or how they write out recipes on post-its that they stick on the counter while they work. The abundance of care and work that go into creating this pantry/equipment/process chapter is obvious. You know? Don't you usually read this section?

Yeah, me neither. I want to look at the pretty pictures already.

But when I went to see family for Thanksgiving, I ended up going to a spice shop I've been wanting to check out for a while and subsequently dropped a fair amount of cash on some spices I've been having trouble finding (and some that I have never seen before but am so excited to use). And then I came home to our hap-hazard pantry with its crazy amount of beans and nearly empty boxes of pasta, and thought "This is no place for my spices!" So I cleaned out the shelves, reorganized everything, and took note of stuff that was about to run out, and I now have a well-oiled pantry machine. I didn't expect that it would have a profound effect on my efficiency and enjoyment of cooking, but it did! It is crazy! I have joined the Clean Pantry Cult and I am going to prosthelytize to anyone who will listen!!

One of these days I'll write a post on the things that are in my pantry (there will be pictures, promise), but let's talk about this flatbread for a moment. I get most excited by foods with flavor contrasts (salty/sweet, rich/bright, etc.), and I wanted to bring that kind of excitement to this recipe so that it didn't feel like an "I don't know what to make for dinner" kind of a meal (which it most definitely was). It worked sort of like this:

If I ever publish a cookbook, there will be a lot of Venn diagrams (which will probably break up the text a bit in my pantry section, which y'all had better read).

There are so many ingredients that fall into each of these categories (I even listed a few more than I put on the flatbread), so don't feel like you have to limit yourself to what I did, especially because the whole point of this thing is to utilize stuff you have on hand! Just grab a prepared crust or some pizza dough and something bright and fresh on your way home from work, and you'll have a tasty, simple, and homemade meal in the time it takes to order a pizza.

(A quick pantry tip: buy things that you use frequently every time you go to the store, whether you need them immediately or not! I do this with onions, sweet potatoes, and lemons, because I use them multiple times throughout the week, if not every day. And I'll usually also buy some arugula or spinach every week because a pop of green easily takes something from blah to beautiful.)

pantry flatbread

Makes 1 flatbread; serves 4 as a light main, or 6-8 as an appetizer/snack

Aleppo pepper flakes are different from the standard red pepper flakes you can find in the spice aisle, and they are certainly different from the packets that come when you order a pizza to go. Instead of punching the inside of your mouth with heat, these flakes are bright, tart, and pleasantly warming. I don't know if this reflects a level of quality, but the flakes I purchased are also just pepper flakes, with no included seeds. You can find them at specialty stores or online, and a little jar will last you for quite some time.

Also, keep in mind that this is not a pizza, so there is no ooey-gooey-cheesy base holding all of the ingredients on board. Some things will bake together, and some things will be looser. If you want a more cohesive flatbread, omit the olive oil that you drizzle over the dough and replace it with a generous smear of creme fraîche.


1 pound pizza or flatbread dough (I grabbed a container of prepared dough at Whole Foods)
olive oil
1 red onion, thinly sliced from top to tail
1/4 cup white wine (optional) or water
kosher salt
4 oz bacon, sliced into lardons
1/3 cup pitted kalamata olives, torn in half with your fingers
4 oz feta cheese (I used goat's milk feta)
flaky sea salt (I used Maldon)
a couple of handfuls of arugula
Aleppo pepper or other red pepper flakes


About an hour before you want to bake the flatbread, remove the dough from the refrigerator to proof and come to room temperature (it will bake more evenly and be much, much easier to work with).

Preheat your oven to 425˚F. Line a baking sheet with parchment paper.

Place a heavy-bottomed skillet over medium low heat, and add a generous swig of olive oil (enough to coat the bottom of the pan). Add the onions to the oil and sauté, stirring frequently, until they soften and begin to become translucent. Add the white wine and a pinch of kosher salt to the pan and cook for another 2-5 minutes, until the wine has evaporated and the onions are quite limp, but not falling apart. (Note: you do not need to caramelize them to a darker color unless that is what you want; I happen to like some of the brighter purple on the flatbread, and they'll get a little charred anyway during baking.) Remove the onions to a small bowl and set aside.

Place the pan back over the heat and add the bacon lardons. Cook, watching closely (and occasionally stirring), until the lardons are just barely cooked and beginning to get crispy edges. Remove the lardons to a paper towel-lined plate and drain.

Remove the pizza dough from its container and stretch with your hands, pizza parlor style. Don't worry about it being perfect or crazy-thin! Rustic looks best here, so just stretch it as much as you can without tearing the dough.

Place the dough on the parchment-lined baking sheet, and drizzle the dough with a little olive oil. Spread the onions over the dough, and scatter with the bacon and olives. Crumble the feta cheese over the bacon and olives. Gently press the toppings into the dough, just enough to help them stick to the surface while baking (not so much that the dough envelops them and they cannot be seen).

Bake at 425˚F until the dough is fully cooked and the onions at the edge of the dough are crisp and a little charred, about 20-25 minutes (check after 20 minutes). Remove from the oven and let cool for 5-10 minutes, then top with a couple of handfuls of arugula, and some generous pinches of flaky salt and Aleppo pepper flakes.