FIELD & FOREST

desserts

tin roof sundae with brown sugar ice cream

autumn, desserts, sweet, vegetarian, winterFieldandForest8 Comments

This recipe is for my momma, who loves a good Tin Roof sundae! It was (and probably still is) her dessert of choice at one of the restaurants she and my dad would (and probably still do) frequent for celebratory purposes. I think it was the first restaurant I visited as a child where I noticed things like the white tablecloths and starched napkins and fancy silverware, and ate things like fried mushrooms and chicken cooked three-ways and salads with drizzles of truffle oil.

In all honesty, I probably ate only one of the three-ways in which the chicken was cooked and hid the salad leaves in the folds of my napkin. I was not an adventurous lady when I was ten years old.

But I ate a lot of fried mushrooms and Tin Roof sundaes because both items were, according to my mom, non-negotiable facets of dinners at this particular restaurant (and what ten-year-old doesn't love ice cream and things that are fried?). If I remember correctly, the chef once came out to our table during our dinner and brought my mom the recipe for the fried mushrooms because SHE LOVED THEM SO MUCH. She and my dad have since made them at home to many rounds of applause from those lucky enough to be in the mushroom-eating vicinity. But, as she never did get their recipe for the sundae, this recipe approximates that particular dessert quite well, if not better (because brown sugar ice cream!!).

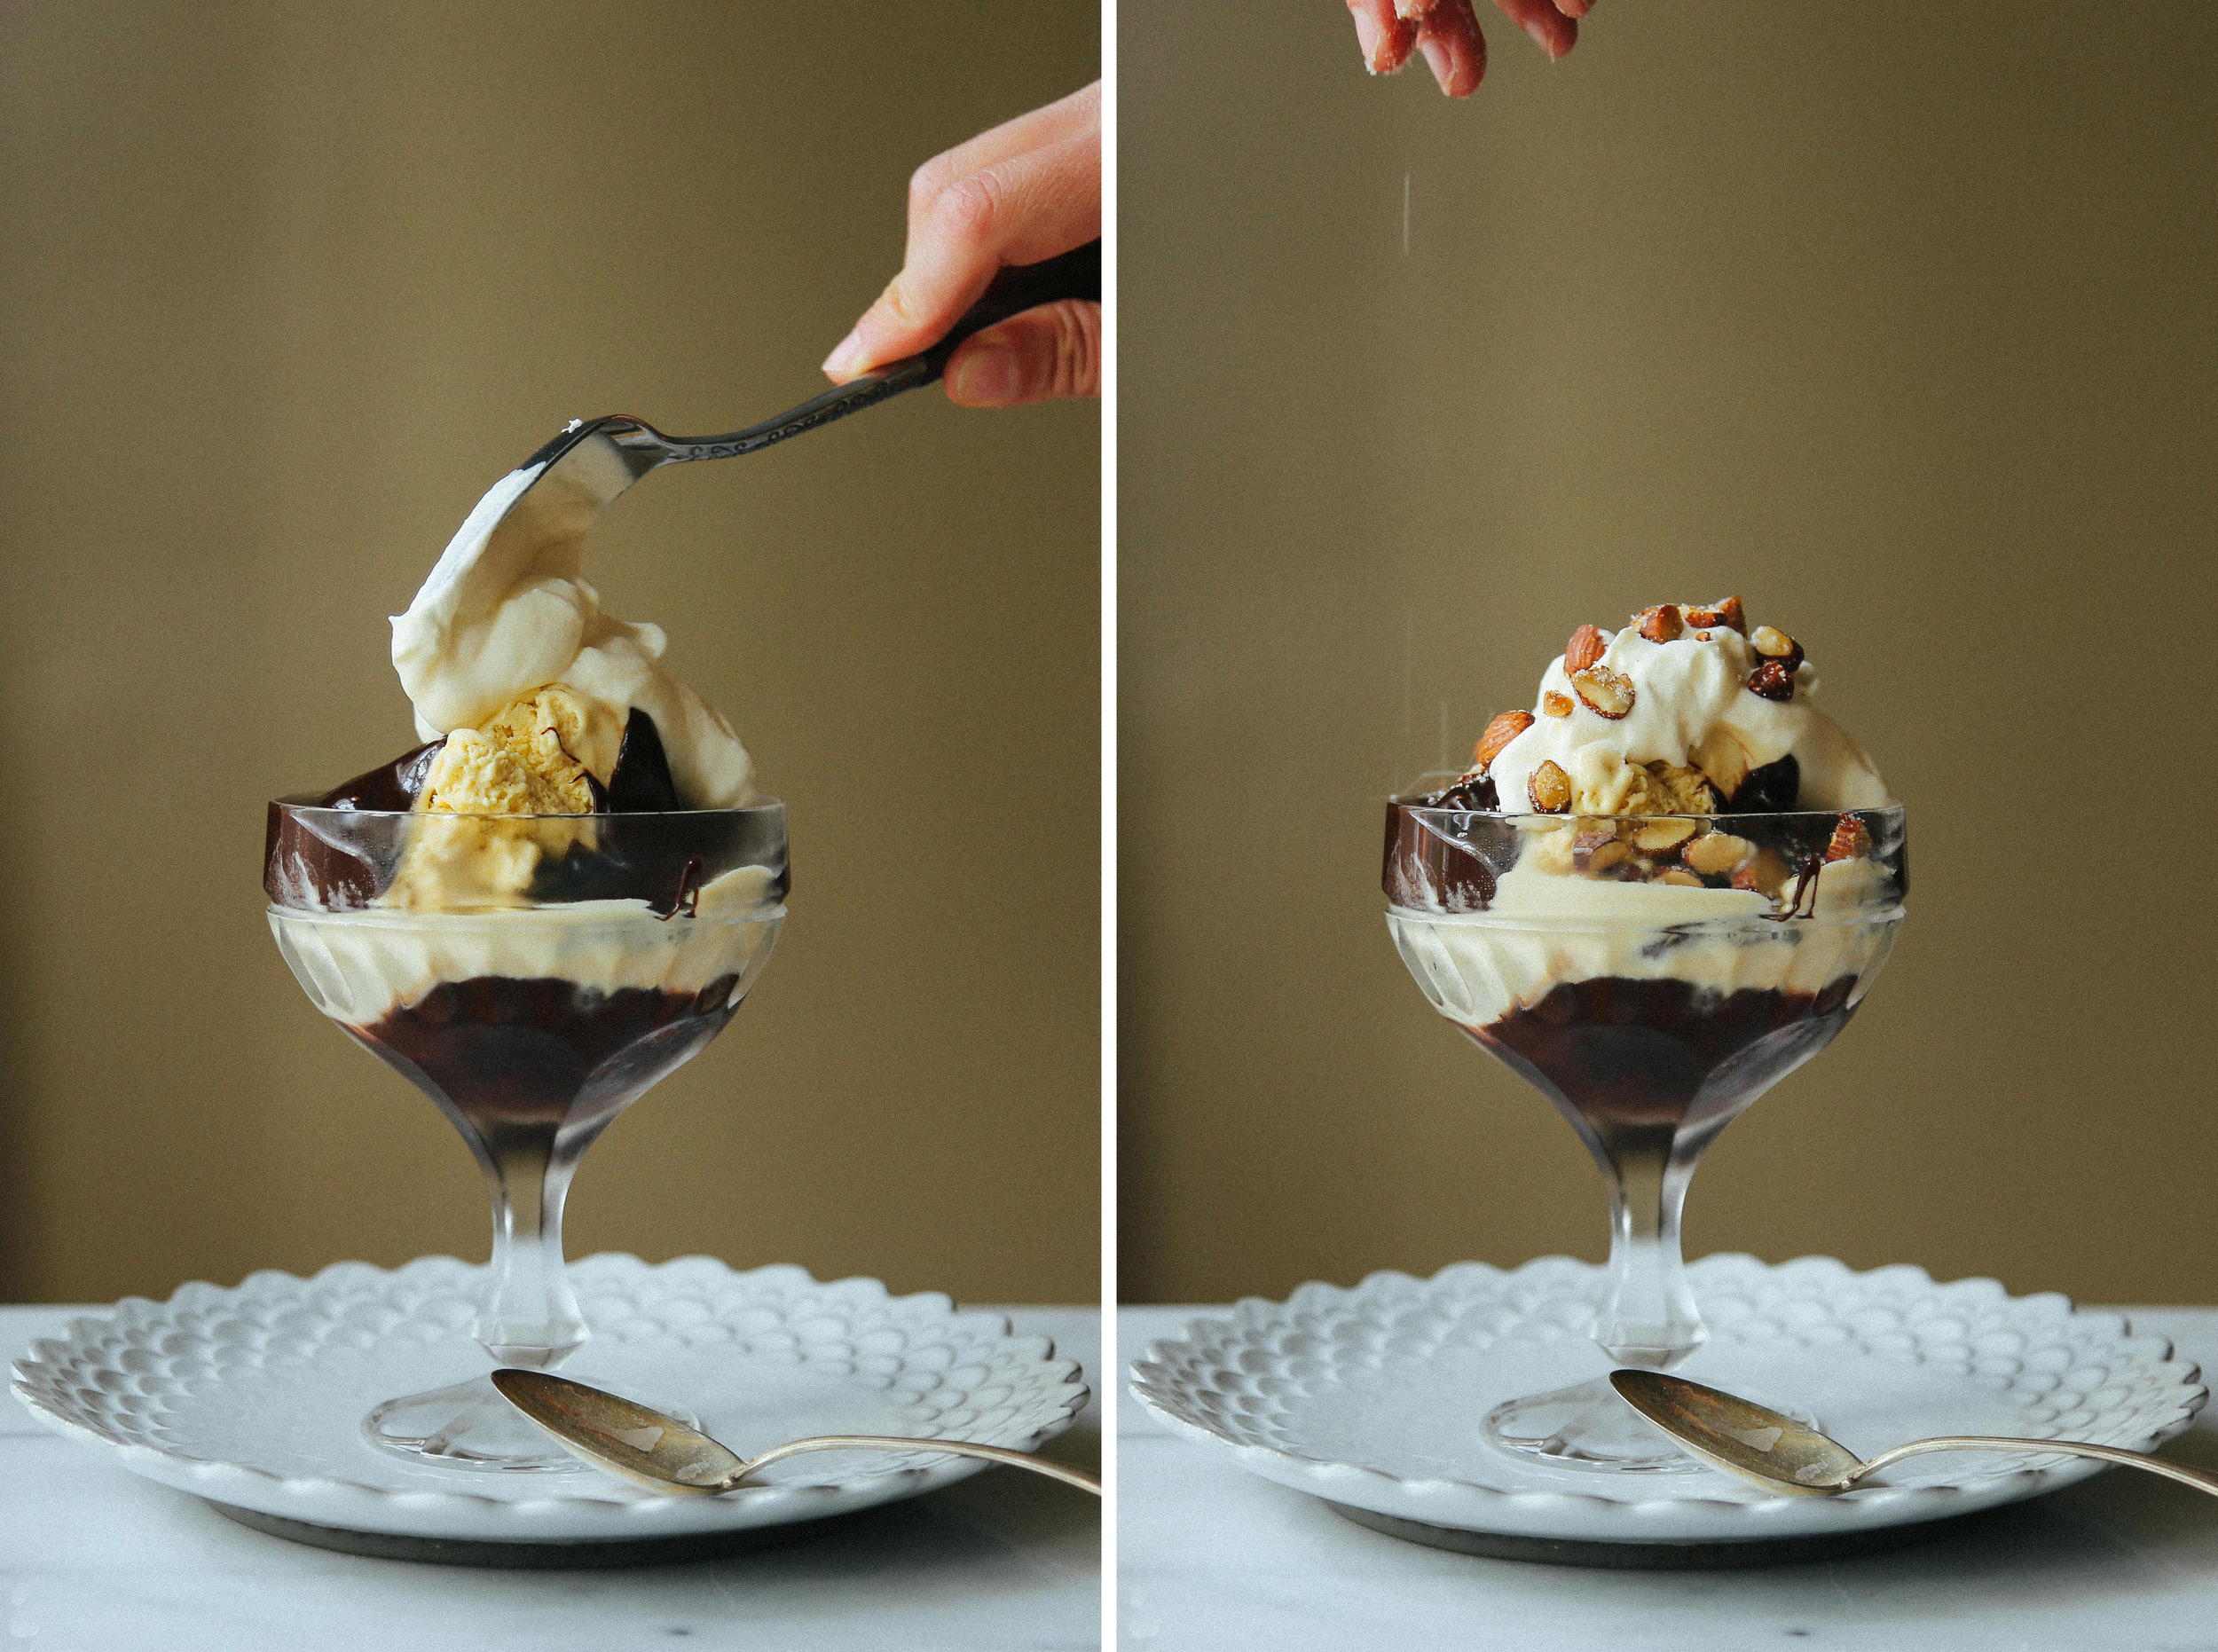
If you are familiar with the basic elements of a Tin Roof Sundae (which specifically involve peanuts), you are probably thinking, "What the heck are those almonds doing there?" They are there because my mom loves the chocolate/almond combo, but you can put peanuts on your sundae, yes you can! You can do whatever you want!

That being said, you absolutely MUST put hot fudge in the bottom of the glass before you put in the ice cream. This is both an insurance policy against anyone sharing your sundae who might decide to take more than their fair share of fudge off of the top, and also a reward for eating a ton of ice cream! Nothing says "Hey, we made it!" like a glass-bottom full of hot fudge.

And the fudge on the saucer? Yeah, I really don't know why it is there, but I like it when ice cream parlors put a giant puddle of sauce underneath my ice cream glass, so why not do it at home? If you're going to have a sundae, have a freaking SUNDAE.

Brown Sugar Ice Cream (makes 1 quart)
Adapted from Prune, by Gabrielle Hamilton

6 egg yolks
3/4 cup brown sugar, divided
1 1/2 cups heavy cream
1 1/2 cups whole milk
1/2 vanilla bean, split and scraped, OR 1 tablespoon good-quality vanilla extract

Beat yolks with 1/2 cup of the brown sugar in a stand mixer with a whisk attachment OR by hand with a whisk until light in color, ribbony, and doubled in volume.

In a heavy-bottomed pot, whisk together the remaining 1/4 cup brown sugar, milk, cream, and vanilla bean or extract, and bring to a low boil over medium-high heat.

With the mixer on (or while whisking continually), slowly pour the hot milk into the egg yolk mixture in a steady stream to temper the eggs.

Pour the egg-yolk milk mixture (henceforth known as custard) back into the pot and cook over medium heat, constantly stirring and scraping the bottom with a heatproof rubber or wooden spatula to prevent scorching/curdling (don't use a whisk). Bring to 180˚F, or cook until the custard coats the spatula. (I usually test my custard with a wooden spoon by coating the back and dragging my finger through the custard. If it leaves a clean-ish stripe of spoon that doesn't get quickly filled in by the custard, it is done.)

Remove from heat and strain into a bowl or container with a lid. Let cool, or speed the process by placing the bowl/container into an ice bath and mixing the custard to bring its temperature down. Cover, and place in the refrigerator to thoroughly chill (at least 2 hours, or overnight). Spin in an ice cream maker according to the manufacturer's instructions.

Hot Fudge Sauce
Adapted from Bi-Rite Creamery
A few quick notes: using a dark cocoa gives hot fudge sauce its signature color! While Dutch-processed works well for this purpose, the flavor will be richer and more chocolatey with a naturally dark (less-processed) cocoa. I know how we all feel about sifting, but do sift the cocoa powder, or you'll get little nuggets of unsweetened chalkiness in your hot fudge sauce. The corn syrup business is there because it is an invert-sugar (meaning not crystallized), which helps give the sauce a glossy appearance and smooth, fudgey texture.

1/2 cup heavy cream
1/2 cup sugar
2 tablespoons dark cocoa powder (such as Valrhona) or Dutch-processed cocoa powder, measured, then sifted
1/4 cup corn syrup, glucose, or tapioca syrup
1/2 teaspoon kosher salt
2 ounces bittersweet chocolate (about 60% cacao), finely chopped
2 ounces unsweetened chocolate, finely chopped
1/2 teaspoon pure vanilla extract

In a medium non-reactive saucepan, stir together the cream, sugar, cocoa powder, corn syrup, and salt. Place the pan over medium-high heat and bring to a boil, cooking just until the sugar has dissolved. Remove the pan from the heat, and stir in both chocolates and the vanilla until the chocolate is melted and the sauce is completely smooth. Use a spatula to smooth any lumps by pressing and smearing them against the bottom of the pan.

Serve immediately, or store in an air-tight container in the fridge for up to 1 month. Rewarm over low heat on the stove, or in the microwave at half-power for 30 seconds to 1 minute (it only takes a few seconds for the sauce to boil when on high power).

Salt and Sugar Almonds

1/2 tablespoon butter
1/2 cup almonds, roughly chopped
1/2 teaspoon kosher salt
1 tablespoon sugar

Melt the butter in a heavy-bottomed skillet over medium heat. Add the almonds, and toss to coat with the butter. Cook over medium heat, stirring frequently, until the almonds begin to color and turn golden brown (and smell reeeeeaaally good). You may remove the almonds from the heat at this point, or cook them for a few more minutes if you prefer a deeper color and nuttier flavor.

Transfer the almonds to a bowl or plate and let cool for a few minutes (this keeps the warm butter from melting the salt and sugar, since I like the look of sugar granules on the nuts). Sprinkle the almonds with the salt and sugar and toss to evenly coat. Use immediately, or store in an airtight container at room temperature for up to two weeks.

Whipped Cream

1 cup heavy cream
2 tablespoons - 1/4 cup powdered sugar (depending on how sweet you'd like your whipped cream)
1/2 tablespoon vanilla

Whisk together the cream, powdered sugar, and vanilla in a large bowl, or in the bowl of a stand mixer fitted with the whisk attachment. Using a balloon whisk (or the attachment of your mixer), beat the cream at least until soft peaks form, and up until firm peaks form (depending on how stiff you like your whipped cream on your sundae). Serve immediately, or store in the refrigerator for up to 3 days, rewhipping if necessary.

To assemble your sundaes:

Step 1: Chill your sundae glasses, warm your hot fudge sauce, and assemble your loved ones/friends/deserving acquaintances!

Step 2: Place a good dollop of hot fudge sauce in the bottom of each sundae glass, and top with a couple of generous scoops of ice cream. Drizzle more hot fudge over the ice cream, making sure to get some in the nooks and crannies between the ice cream scoops. Top with a dollop of whipped cream and a generous sprinkle of almonds. Place on plates coated with even more fudge sauce and almonds. Enjoy every moment of your amazing sundae!

Step 3 (optional): Nap.

bittersweet chocolate things

autumn, breads, breakfast, desserts, spring, vegetarian, winterFieldandForest2 Comments

Zomg. You guys. YOU GUYS. Mrrgkjslkjglskfs.

I can't even write real words right now, I am so excited.

Because Cheese Board Chocolate Things. In Salt Lake City. In our kitchen. That came out of our oven. If you know what the Cheese Board is, then I know you're excited, too. If you don't know what the Cheese Board is, I hope you are at least intrigued by the sheer volume of chocolate folded into this ball of dough. If you know what the Cheese Board is, but you currently live in Berkeley and are thinking "Whatevs, I can get Chocolate Things whenever I want," then shut it. We don't want to hear about it.

(That's a lie, please tell us everything, because goodness knows we're dying over here without our zucchini-corn pizza and oatmeal scones.)

So anyway. What is this Cheese Board thing. Well, it is one of the many magical places in that mystical land known as the Gourmet Ghetto, and it makes amazing breads (and its next-door sister restaurant, Cheese Board Pizza, makes some of the best pizzas in town) and has a crazy cheese selection sourced from all over the planet, and it is one of THE foodie destinations of Berkeley (and it is across the street from Chez Panisse, so you can ogle another institution while you eat your pizza!). Both the pizzeria and the bakery are part of the same collectively owned business (together they are known as the Cheese Board Collective) and they have a pretty unique story of how they've worked to support other collectives/co-ops, and a number of years ago they did everyone a solid and made a cookbook.

And it is glorious.

Everything I've made out of that book is pure gold and tastes almost exactly how I remember Cheese Board pastries and pizza. Sure, I don't have a deck oven or a proofing cabinet, but the essence of every baked good is there. Ownership of this book (and therefore access to all of its secrets) is enough to make a Bay Area expat plant roots in a red state and say "We're good here."

At least for the time being.

And now a few words from the Voice of Experience to help you achieve your Chocolate Thing dreams! One, do not get super nit-picky about keeping all of the chocolate pieces in the dough when you first mix them in. Some of them will fall out. I'll give you a cheat for working them back in later. Two, use a wire or a floured piece of baker's twine to cut the rolled dough into rounds. This applies equal pressure on all sides of the roll so you end up with neat, photogenic little buns instead of rolls that are all smushed into ovals. Not that there is anything wrong with ovals! We are accepting of all shapes and sizes of rolls over here.

Finally, invite over some friends to help you eat the rolls, because these truly are best eaten warm from the oven while the dough is tender and the chocolate is slightly melty (and this way it saves you from eating all of the rolls yourself in one sitting, though you could probably have worse things happen to you, let's be honest).

Chocolate Things
adapted from the Cheese Board Collective Works cookbook - Makes 12 things

1/2 cup heavy cream
1/2 cup buttermilk
2 1/4 teaspoons active dry yeast
2 1/2 cups unbleached all-purpose flour
6 tablespoons unsalted butter at room temperature
1/3 cup sugar
2 eggs
1 1/2 teaspoon kosher salt
6 ounces dark chocolate, chopped into 1-inch pieces

In a small saucepan, heat the cream and buttermilk over low heat until small bubbles form around the edges of the pan. Pour into a bowl of a stand mixer or a large bowl (if mixing by hand). Let cool until just warm, then whisk in the yeast until dissolved. Let stand for 5 minutes.

If using a stand mixer, add the flour, butter, sugar, 1 of the eggs, and the salt to the bowl. With the paddle attachment on medium speed, mix until the ingredients are combined, about 2 minutes. If the dough is too soupy, add extra flour by the tablespoonful until the dough forms a loose ball around the paddle. Switch to the dough hook and knead on medium speed for 7 minutes, or until the dough is smooth, silky, and elastic. Add the chocolate and knead just long enough to incorporate it (do this step as quickly as possible, as overmixing will result in broken pieces of chocolate and discolored dough).

If making by hand, add the flour, butter, sugar, 1 of the eggs, and the salt to the bowl. Mix with a wooden spoon until combined. If the dough is too soupy, add extra flour by the tablespoonful. Transfer to a lightly floured surface and knead the dough for 10 minutes or until it is smooth, silky, and elastic. Flatten the dough into a 1-inch-thick round and place the chocolate in the center. Gather the dough around the chocolate and knead just long enough to incorporate it.

A quick note: I did a stand mixer/hand mix mash-up where I made the dough with the stand mixer, but kneaded in the chocolate pieces by hand. That seemed easiest to me (and kept chocolate pieces from ricocheting out of my mixer). Just FYI!

Form the dough into a ball and place it in a large oiled bowl. Turn the dough over to cover it with oil. Cover the bowl with plastic wrap or a damp kitchen towel and let rise in a warm, draft-free place for one hour, or until doubled in size. Alternatively, refrigerate the dough to rise slowly overnight. The next morning, remove the dough from the refrigerator and let stand in a warm place for at least an hour before proceeding.

Line a baking sheet with parchment paper or a baking mat. Transfer the dough to a lightly floured surface and roll it out into a 10 by 12-inch rectangle. Don't worry if pieces of chocolate fall out of the dough, just set them aside for the time being. In a small bowl, beat the remaining egg with a whisk. Using a pastry brush (or your fingers, which are easier to clean!) brush a stripe down one of the long edges (and save the leftover egg! You'll use it later!). Take all of the pieces of chocolate that fell out of the dough earlier and scatter them across the dough rectangle. Starting with the non-egg-wash coated edge, roll up the dough lengthwise into a jelly roll shape (rolling up the loose chocolate pieces as you go), using the egg-washed edge to seal the dough roll together. See what we did there? Sneaky, sneaky!

Using a sharp knife, a bench scraper, or a piece of wire or floured baker's twine, cut the roll into twelve 1-inch thick slices and place them on the prepared pan, cut side up, about two inches apart. Cover them with a kitchen towel and let rise in a warm place for 1 hour, or until the rolls are increased in size by one-third.

Fifteen minutes prior to baking, preheat the oven to 350˚F. Using a pastry brush (orrrr your fingerssss), brush the sides and tops of the each roll with the beaten egg. Bake on the middle rack of the oven for 30-35 minutes, or until golden brown. Transfer to a wire rack to cool, or to your face to be eaten.

weekday morning sufganiyot

autumn, breads, breakfast, desserts, snacks, spring, summer, vegetarian, winterFieldandForest7 Comments
4j5a2194.jpg

This post came about weirdly. It began with me wanting to bake something and it ended with me making sufganiyot (also known as Israeli doughnuts, also known as one of the top ten most delicious things on the planet), but somewhere in the middle there I spent 45 minutes standing over the vent in the oven door while it "preheated," flipping through cookbooks in an under-caffeinated haze and wishing that something bread-like and cakey would magically appear in front of me. Every day, lately, has had enough cloudiness and post-holiday malaise to be a potential baking day, albeit one where I am always out of something where 99.9% of the time something = buttermilk.

Note to self: buy buttermilk always. Every time you go to the store. No more of this faking it with milk and lemon juice. Buy buttermilk. BUUUUY IIIIIIIT.

And when you don't buy buttermilk, buy yogurt so you can make sufganiyot.

If you haven't made sufganiyot before, there is no time like the present. Seriously. It will take you 5 minutes to make the batter, and a minute or two of panfrying on each side to get you straight to Doughnutland. Or Sufganiyotville. Or wherever you want to go so long as it is crispy and covered in powdered sugar.

Weekday Morning Sufganiyot (Israeli Doughnuts)
recipe courtesy of my mom <3
I would take these little fritters over raised glazed doughnuts any day. If someone tells you they are having a bad day, make them these; they will feel better. If you are having a bad day, make them for yourself; you will feel better. If you or someone else is having a good day, make them anyway! You have to eat breakfast, right?

1 1/2 cups flour
1 t. baking powder
1 T sugar
1 egg
1 cup yogurt
canola oil or ghee

Mix all ingredients together.  Heat oil or ghee in frying pan (enough to completely coat the bottom of the pan).  Once the oil is hot, drop tablespoons of batter into the pan.  Carefully flip when brown.  Briefly (for 5-10 seconds) rest cooked sufganiyot on a paper towel, roll in powdered sugar, and serve immediately with jam.

triple-ginger cookies

desserts, vegetarian, winterFieldandForest2 Comments

This post is short, as is fitting when you find a recipe which is exemplary and needs no embellishment. You can wait to make these in celebration of a winter holiday, but really, what is the point in waiting? If you make the dough in the morning, you can roll and bake them at night and have almost immediate cookie gratification. And then, the next morning, you can crumble one into your muesli because that is one of the pleasures of being a grown up.

Triple-Ginger Snaps
lightly adapted from Miette

Notes: you don't even really need the icing on these (in fact, I almost prefer them without), but they add to the presentation and make for a festive addition to your holiday cookie repertoire.  Baking the cookies for 12 minutes instead of 10 will give you a more traditional, snappier texture, though I like the slightly soft texture of the 10-minute cookies.

2 cups unbleached all-purpose flour or gluten-free all-purpose flour
1/2 cup whole wheat flour
1/2 teaspoon kosher salt
2 tablespoons plus 1 teaspoon ground ginger
generous 1/4 teaspoon ground cinnamon
1/8 teaspoon ground cloves
1/8 teaspoon ground nutmeg
scant 1/8 teaspoon ground cardamom
1 cup unsalted butter, at room temperature
3/4 cup lightly packed golden brown sugar
2 tablespoons honey
4 tablespoons molasses
2 teaspoons fresh ginger purée (make by grating fresh ginger root on a microplane)
1/2 cup finely minced candied ginger
PTIONAL: turbinado sugar for sprinkling or royal icing (see recipe below) for decorating


Sift together the flours with the salt and spices, and set aside.  In the bowl of a stand mixer fitted with the paddle attachment, beat together the butter and sugar on low speed until fluffy, 4 to 5 minutes.  Add the honey, molasses, and fresh ginger purée and mix until fully incorporated.

Add the dry ingredients to the butter mixture in three additions, scraping down the bowl and beating just to combine after each addition, stopping after the last addition when very little of the flour is still visible and the dough is smoother and forming into a mass.  Briefly mix in the candied ginger until it is evenly distributed in the dough.  Form the dough into a disk, wrap tightly in plastic wrap, and refrigerate for at least 30 minutes or up to 2 days before rolling.

Preheat the oven to 350˚F.  Line two baking sheets with parchment paper.

Roll the dough on a lightly floured surface to about 1/4 inch thick.  Cut with a 3-inch round or scalloped round cutter and place on baking sheets about 1/2 inch apart.  Sprinkle each cookie with turbinado sugar if desired.  Bake until deeply browned, 10-12 minutes (I baked mine for 10, and loved the texture).  Remove to a wire rack to cool.  Decorate with royal icing if desired, and store in airtight containers for up to two weeks.

Royal Icing
adapted from Alton Brown - Makes about 3 cups

3 pasteurized egg whites
1 teaspoon vanilla extract
4 cups powdered sugar

In the bowl of a stand mixer fitted with the paddle attachment, beat the egg whites and vanilla together until frothy.  Gradually add the powdered sugar and beat on low speed until the sugar is incorporated and the mixture is shiny.  Turn the speed up to high and beat for about 5-7 minutes, or until the mixture forms stiff, glossy peaks.  Add food coloring if desired.  For immediate use, transfer to a piping bag or plastic squeeze container.  Store in an airtight container in the fridge for up to 3 days.

Notes: do not eat too much of the icing on its own; doing so will give you a thorough sugar hangover and you'll need to sit down for a while.  This has been the Voice of Experience.

concord grape and rosemary focaccia

autumn, breads, breakfast, desserts, vegetarian, winterFieldandForestComment

It is rare to walk a block in Salt Lake City without passing a grape vine or two draped over a fence or stealthily climbing a tree. Grapes grow well here, and are one of the first plants to offer an abundance of foliage in the spring. I think, for that reason, they’ve become a popular choice for home gardens since it seems like we’re all starving for something lush and green after months of brown earth and snow. They also produce plenty of fruit, more than most people can consume on their own, which is why some will reach out to the grapeless and invite us to help (and eat). There is now a palpable sense of urgency to rehome fruit since we don’t know when the first snow will arrive; the window for picking some varieties will close following a deep freeze as their skins will crack and burst as their cells expand in the cold.

But there are indeed some silver linings to the end of the season. The leaves have now all shriveled on the vines (products of dwindling temperatures and two lightening-fast freezes over the last month), and it seems almost unfair how easily one can see exposed fat bunches of grapes. You would only need to stand next to the vine with your eyes closed and reach towards it to feel the hundreds of fruits waiting to be picked. We moved up and down the fence, gently snapping stems, greedily dropping the grapes into bags that quickly became heavy and juice-stained. We stopped after twenty minutes, embarrassed that maybe we had taken more than our share and already realizing that we had no plans for the poundage now in our possession. But I daresay that, had you visited the vine after we left, you would have been distracted by the remaining fruit and would never have known we were there.

If you’ve ever looked at recipes involving grapes, you might wonder why some specifically call for Concord grapes. I think experiencing their flavor is the only way to truly understand the reasoning. They are so very… grapey. Eat one (if you haven't already) and I think you’ll agree. I have heard people say that they just do not like Concord grapes, and while I enjoy them, I understand how they might feel that way. They are a gamey fruit, with a sharp, unmistakable flavor and robust, matte skin. We have small vine in our own garden, next to a separate vine of a pale green grape (Thomson Seedless, perhaps?) that offers tiny fruits with delicate skins; while the Concord grapes are almost offensively flavorful, eating the lighter grapes is akin to biting into bubbles of perfume. They are the suckling pig to the Concord’s wild boar, and more of a crowd pleaser, I think. But they do not hold up well to cooking, and are best consumed off of the vine (or out of the bag).

If you cannot find Concord grapes or don’t want to use them, a seedless red variety will do well here. Use grapes that are relatively firm when gently squeezed; aging grapes  that are beginning to wrinkle will give you more of a raisin effect when baked. If you choose to use a seeded variety and remove the seeds yourself, give yourself an extra half-hour to do so and only serve this bread to people you really like.

 Concord Grape and Rosemary Focaccia
Adapted from Ripe, by Nigel Slater - makes 1 loaf
(Richard would like you to know that this is one serving, though Nigel claims it can serve up to eight)

3 1/4 cups white bread flour or all-purpose flour
1 teaspoon fine sea salt or table salt
1 tablespoon white sugar
2 teaspoons active dry yeast
1 1/2 cups warm water (105-115˚F or just barely warm to the touch)
4 tablespoons olive oil, divided
14 oz concord grapes, halved and seeded, divided
1 tablespoon pearl sugar
large pinch flaky sea salt, such as Maldon
1 teaspoon finely chopped rosemary
little confectioner's sugar


Line a sheet pan with parchment paper and set aside.

Combine the flour and salt in a large bowl.  In a small bowl, mix the yeast and sugar into the warm water, and set aside for 5 minutes (this is called proofing, and allows you to make sure that your yeast is alive).  You should start to see little bubbles on the surface of the mixture after a few minutes; this means the mixture is active. (If you don't see bubbles, your yeast may have expired, or your water may have been too hot.  Check your yeast's expiration date, and try again with new yeast and fresh water).  Once your yeast has proofed, add the mixture to the flour and salt along with 1 tablespoon olive oil, stir with a wooden spoon, and turn out onto a generously floured board and knead lightly for 5 minutes.

Once the dough feels elastic and "alive," put it into a lightly oiled bowl and cover with a damp tea towel (this creates a humid environment to help support yeast activity and keep the dough from drying out) and set in a warm place to rise.  It will take approximately one hour to double in size.  (If you haven't already prepped your grapes, now is an excellent time to do so!)  Once the dough has doubled, punch it down gently to release some of the air.  Add half of the grapes to the dough (while still in the bowl) and gently knead them in until they are evenly distributed.  Tip the dough out onto the parchment lined pan, and shape into a flat circle.  Pock the surface with your fingers, like you are playing piano on the dough, and scatter over the remaining grapes.  Cover the dough with the tea towel and return to a warm place to rise.

Preheat the oven to 425˚F (220˚C).  Once the dough has expanded to almost twice its size, drizzle over the olive oil, and scatter with the pearl sugar, salt, and rosemary.  Bake in the middle of the oven for 30-40 minutes, until well-risen and golden brown.  The focaccia should feel springy when pressed.  Leave to cool slightly before dusting with confectioners' sugar.  Cut into thick wedges and serve warm.

Notes on making this ahead of time:  Focaccia is best eaten within a few hours of baking, and will lose its magic when stored overnight.  If you cannot complete all of the steps in a single day, make the dough, place in the oiled bowl, and store, covered, in the fridge to rise overnight.  Let the dough come to room temperature for 1/2 an hour in the morning before kneading in the grapes and shaping it for the second rise.  You may again store the dough in the fridge for the second rise if necessary, letting it sit out of the fridge for 1/2 an hour before baking.