FIELD & FOREST

caramelized onions

pantry flatbread with arugula and aleppo pepper

autumn, breads, breakfast, dinner, lunch, main dishes, snacks, spring, winterRachel SandersComment

In the beginning of many cookbooks, there is a chapter with no pictures where the chef/author talks about the foods they like to keep on hand at any given time, how to stock a pantry properly, etc. Sometimes they'll go over unique ingredients - what they are, where to find them, why you should use them - or pieces of equipment that they can't live without that they've added to their finely curated list of kitchen gadgetry. Or maybe they'll talk a bit about their process - how they clean as they cook, or how they write out recipes on post-its that they stick on the counter while they work. The abundance of care and work that go into creating this pantry/equipment/process chapter is obvious. You know? Don't you usually read this section?

Yeah, me neither. I want to look at the pretty pictures already.

But when I went to see family for Thanksgiving, I ended up going to a spice shop I've been wanting to check out for a while and subsequently dropped a fair amount of cash on some spices I've been having trouble finding (and some that I have never seen before but am so excited to use). And then I came home to our hap-hazard pantry with its crazy amount of beans and nearly empty boxes of pasta, and thought "This is no place for my spices!" So I cleaned out the shelves, reorganized everything, and took note of stuff that was about to run out, and I now have a well-oiled pantry machine. I didn't expect that it would have a profound effect on my efficiency and enjoyment of cooking, but it did! It is crazy! I have joined the Clean Pantry Cult and I am going to prosthelytize to anyone who will listen!!

One of these days I'll write a post on the things that are in my pantry (there will be pictures, promise), but let's talk about this flatbread for a moment. I get most excited by foods with flavor contrasts (salty/sweet, rich/bright, etc.), and I wanted to bring that kind of excitement to this recipe so that it didn't feel like an "I don't know what to make for dinner" kind of a meal (which it most definitely was). It worked sort of like this:

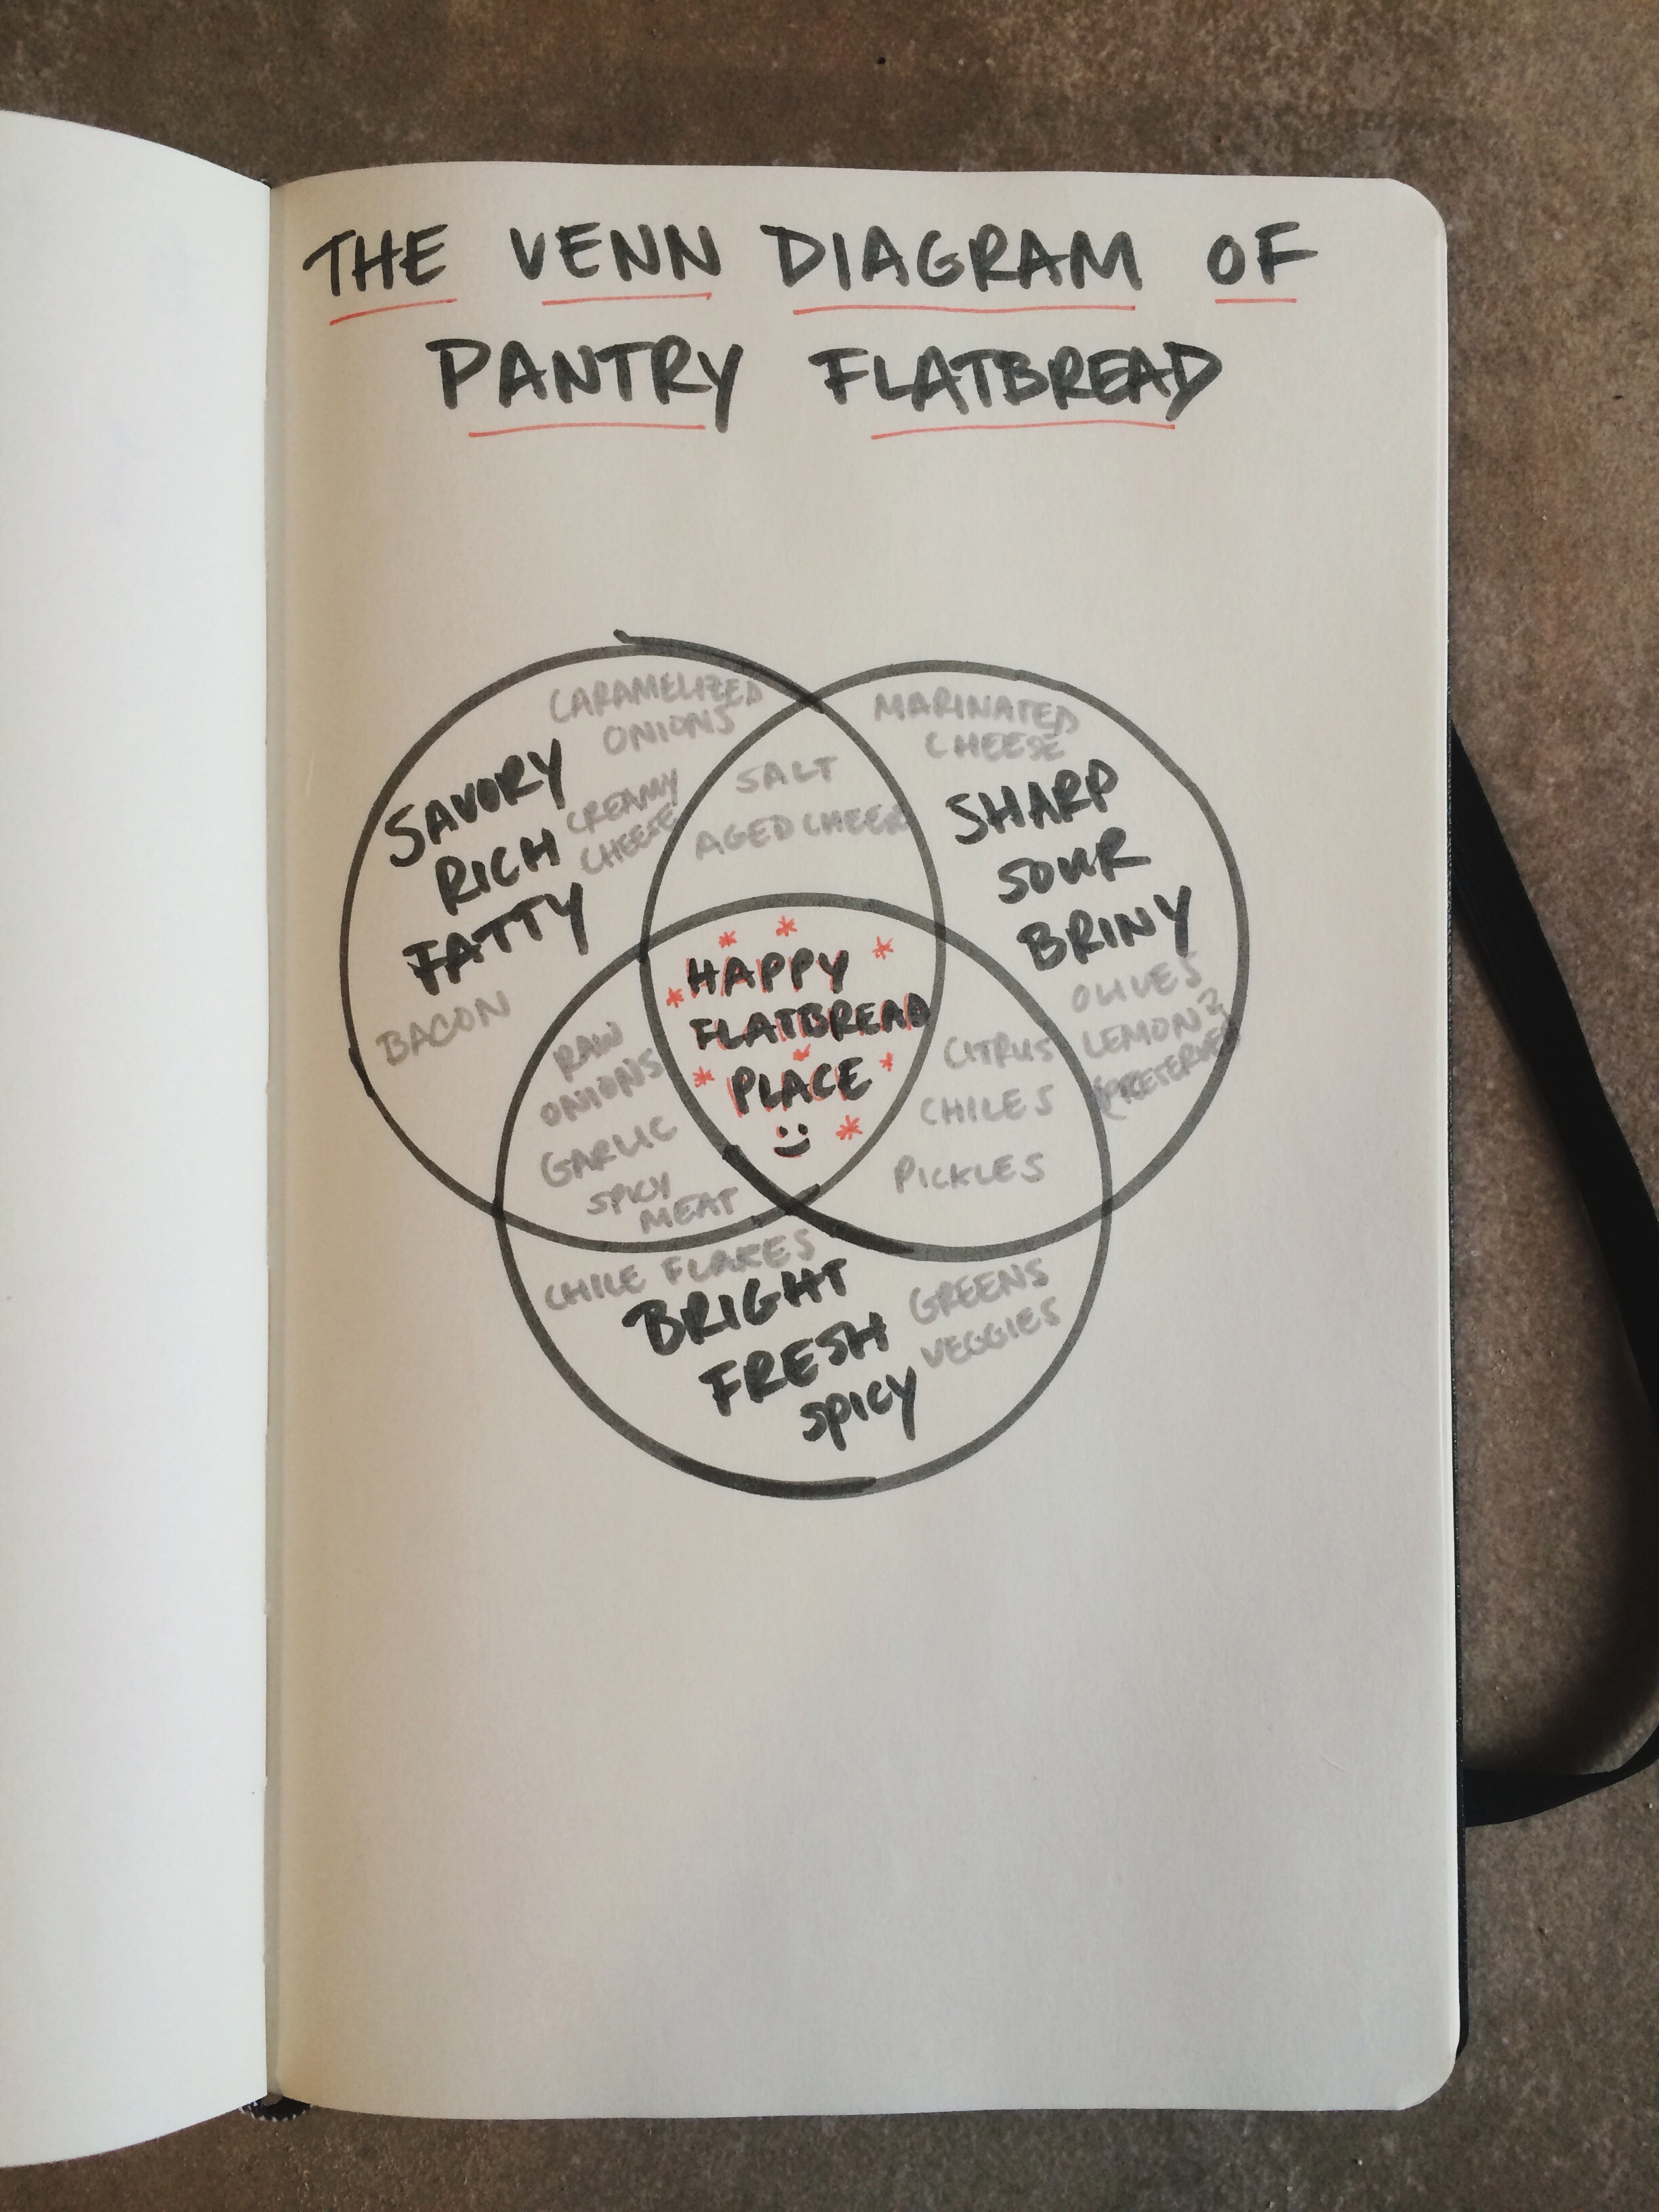
If I ever publish a cookbook, there will be a lot of Venn diagrams (which will probably break up the text a bit in my pantry section, which y'all had better read).

There are so many ingredients that fall into each of these categories (I even listed a few more than I put on the flatbread), so don't feel like you have to limit yourself to what I did, especially because the whole point of this thing is to utilize stuff you have on hand! Just grab a prepared crust or some pizza dough and something bright and fresh on your way home from work, and you'll have a tasty, simple, and homemade meal in the time it takes to order a pizza.

(A quick pantry tip: buy things that you use frequently every time you go to the store, whether you need them immediately or not! I do this with onions, sweet potatoes, and lemons, because I use them multiple times throughout the week, if not every day. And I'll usually also buy some arugula or spinach every week because a pop of green easily takes something from blah to beautiful.)

pantry flatbread

Makes 1 flatbread; serves 4 as a light main, or 6-8 as an appetizer/snack

Aleppo pepper flakes are different from the standard red pepper flakes you can find in the spice aisle, and they are certainly different from the packets that come when you order a pizza to go. Instead of punching the inside of your mouth with heat, these flakes are bright, tart, and pleasantly warming. I don't know if this reflects a level of quality, but the flakes I purchased are also just pepper flakes, with no included seeds. You can find them at specialty stores or online, and a little jar will last you for quite some time.

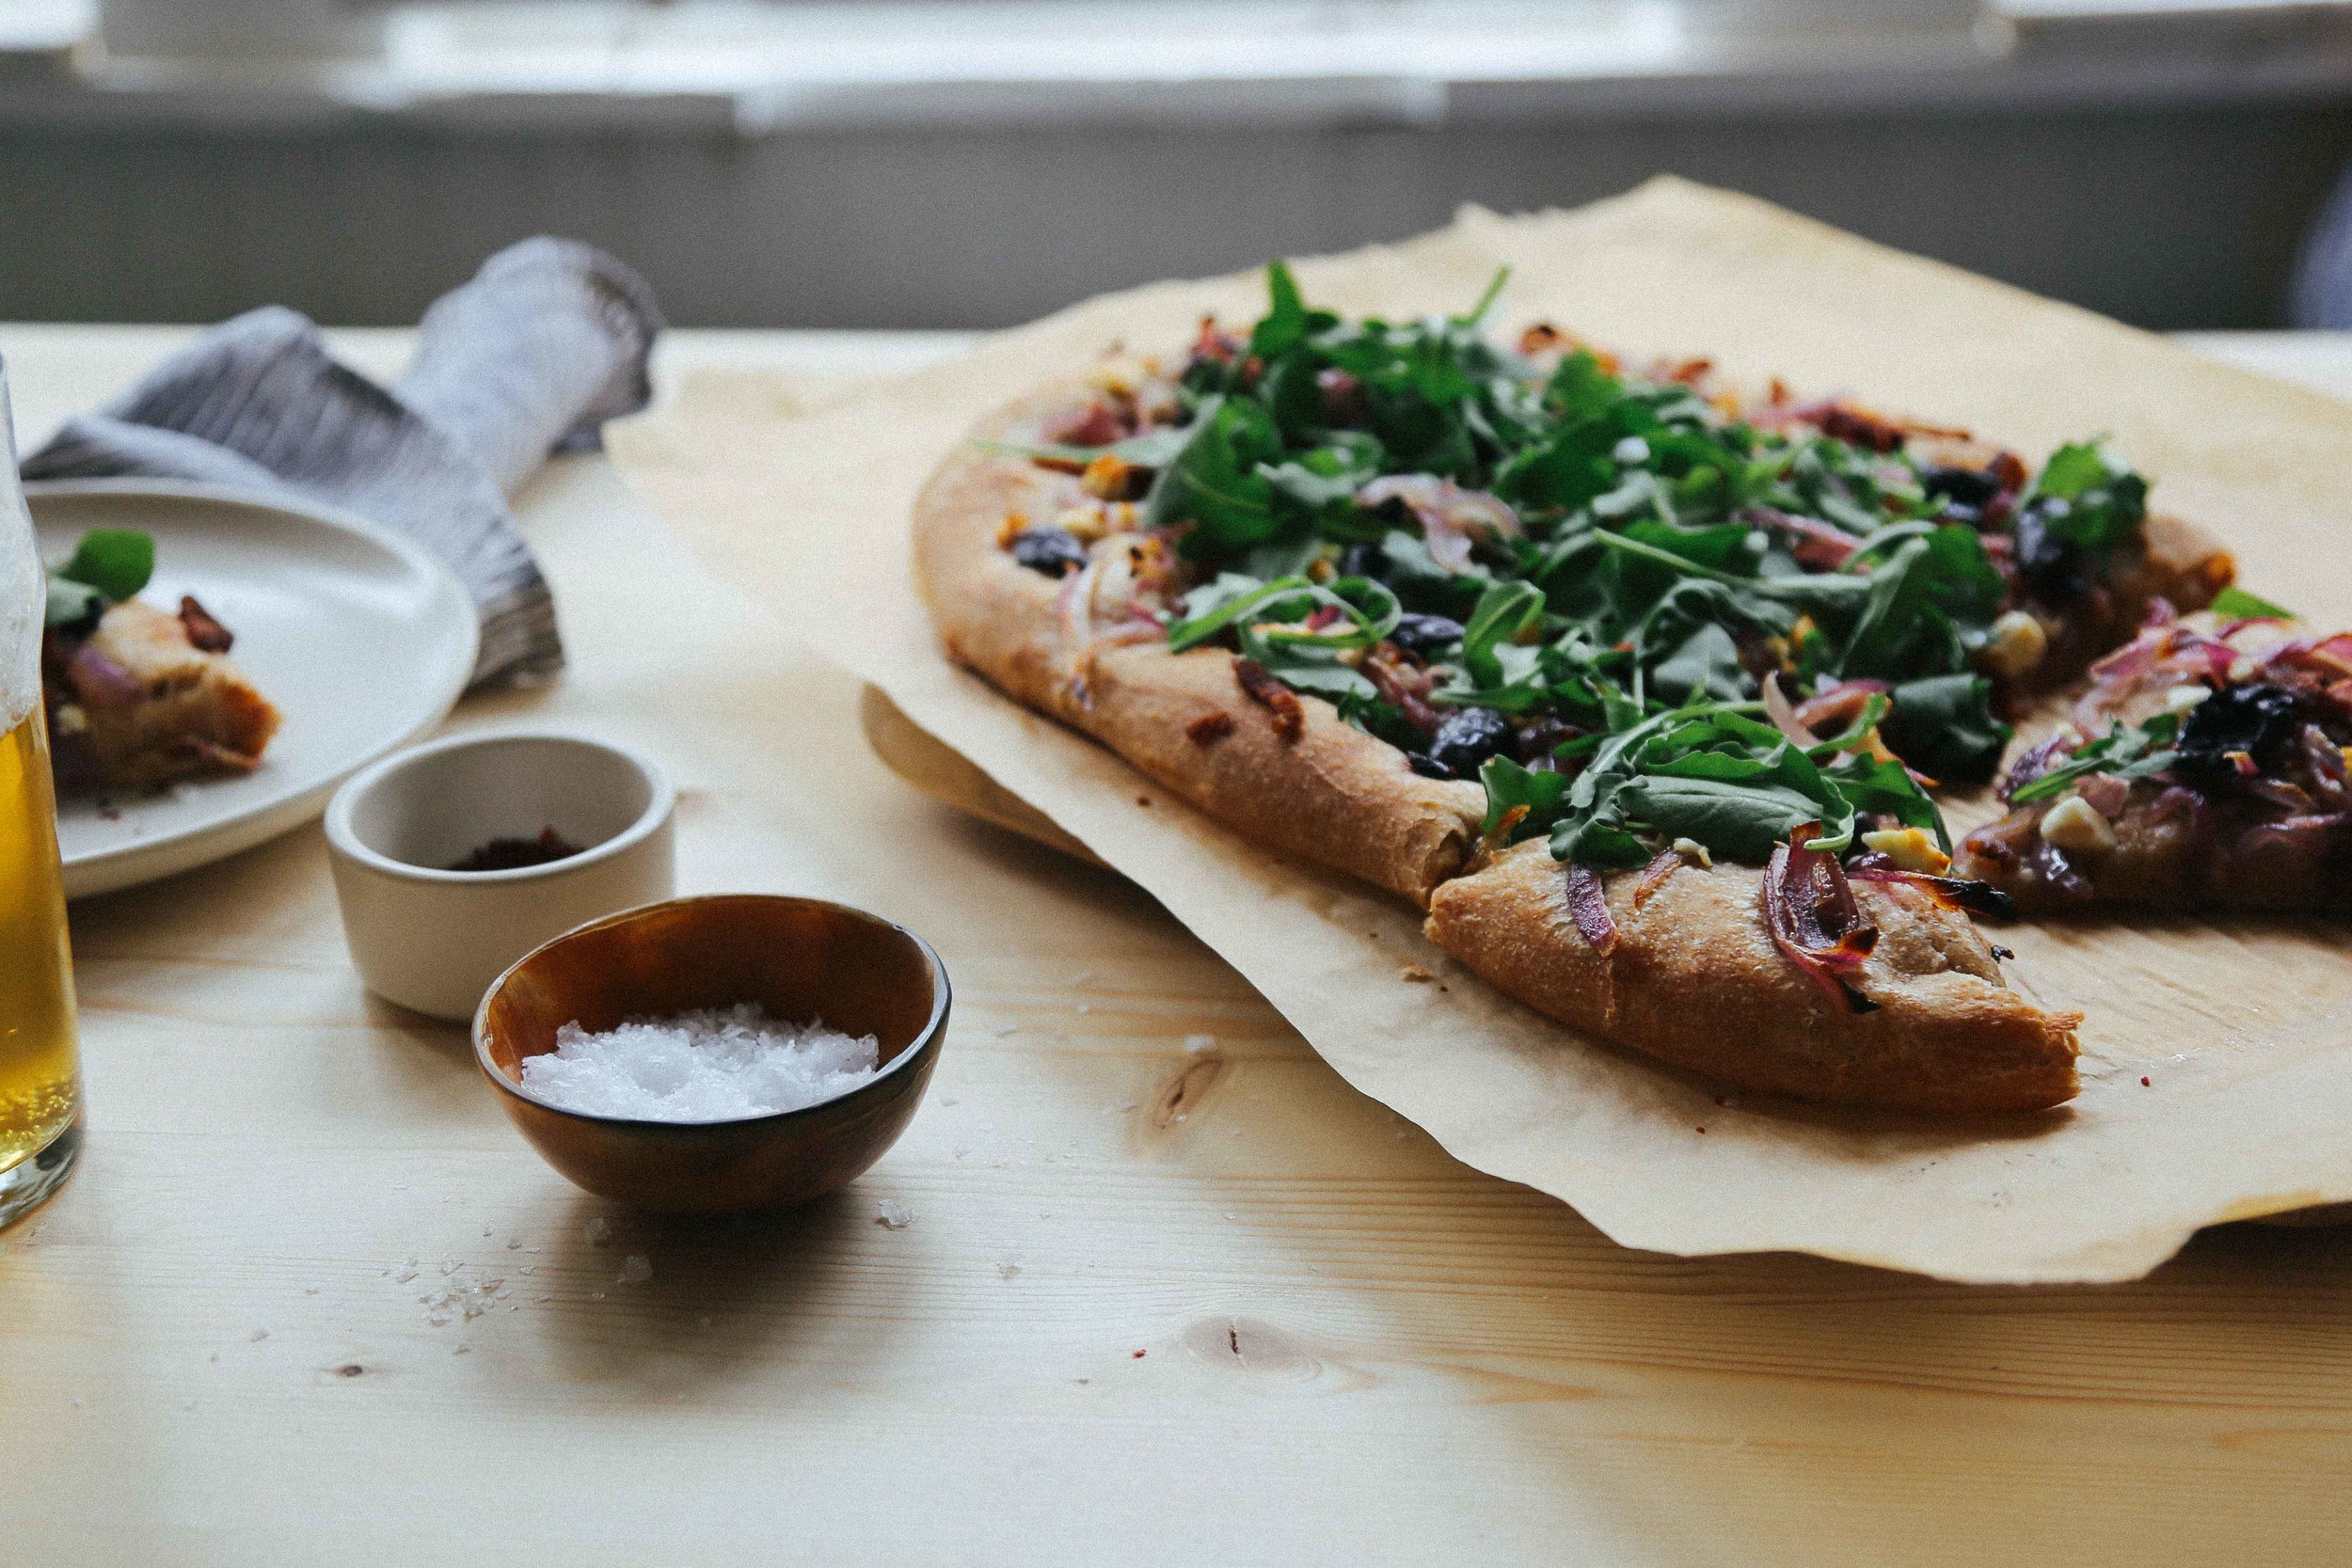
Also, keep in mind that this is not a pizza, so there is no ooey-gooey-cheesy base holding all of the ingredients on board. Some things will bake together, and some things will be looser. If you want a more cohesive flatbread, omit the olive oil that you drizzle over the dough and replace it with a generous smear of creme fraîche.


1 pound pizza or flatbread dough (I grabbed a container of prepared dough at Whole Foods)
olive oil
1 red onion, thinly sliced from top to tail
1/4 cup white wine (optional) or water
kosher salt
4 oz bacon, sliced into lardons
1/3 cup pitted kalamata olives, torn in half with your fingers
4 oz feta cheese (I used goat's milk feta)
flaky sea salt (I used Maldon)
a couple of handfuls of arugula
Aleppo pepper or other red pepper flakes


About an hour before you want to bake the flatbread, remove the dough from the refrigerator to proof and come to room temperature (it will bake more evenly and be much, much easier to work with).

Preheat your oven to 425˚F. Line a baking sheet with parchment paper.

Place a heavy-bottomed skillet over medium low heat, and add a generous swig of olive oil (enough to coat the bottom of the pan). Add the onions to the oil and sauté, stirring frequently, until they soften and begin to become translucent. Add the white wine and a pinch of kosher salt to the pan and cook for another 2-5 minutes, until the wine has evaporated and the onions are quite limp, but not falling apart. (Note: you do not need to caramelize them to a darker color unless that is what you want; I happen to like some of the brighter purple on the flatbread, and they'll get a little charred anyway during baking.) Remove the onions to a small bowl and set aside.

Place the pan back over the heat and add the bacon lardons. Cook, watching closely (and occasionally stirring), until the lardons are just barely cooked and beginning to get crispy edges. Remove the lardons to a paper towel-lined plate and drain.

Remove the pizza dough from its container and stretch with your hands, pizza parlor style. Don't worry about it being perfect or crazy-thin! Rustic looks best here, so just stretch it as much as you can without tearing the dough.

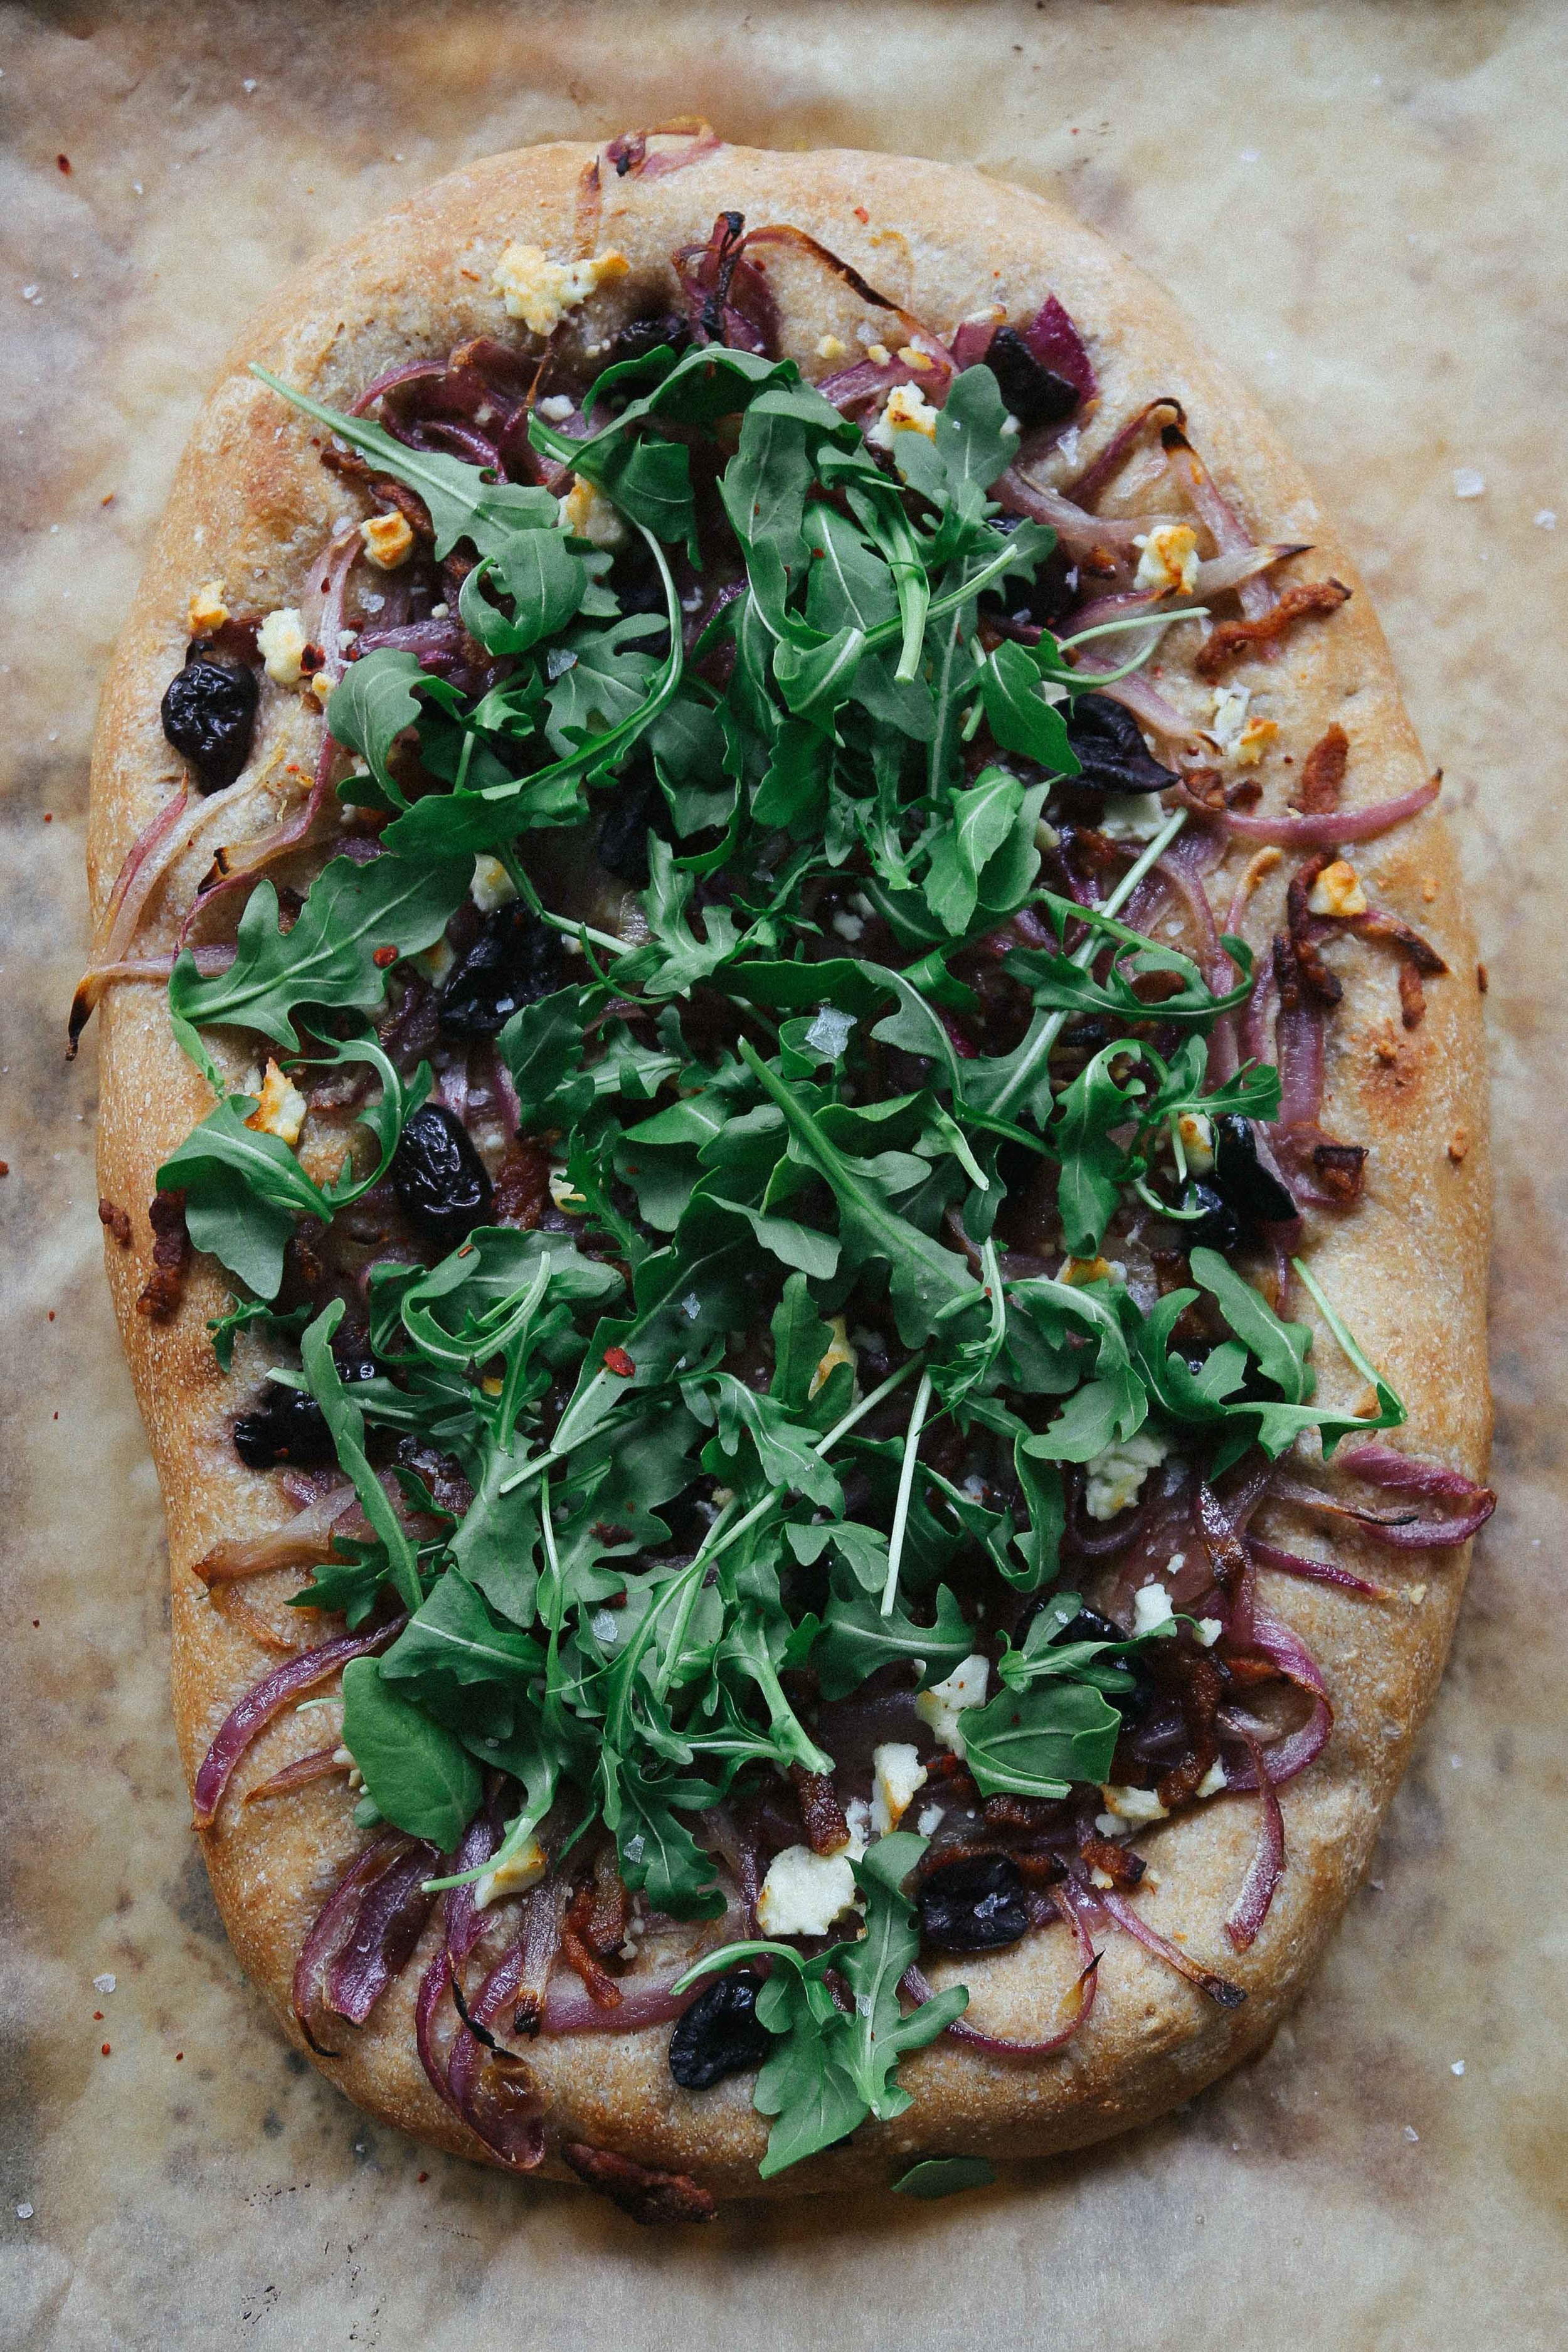
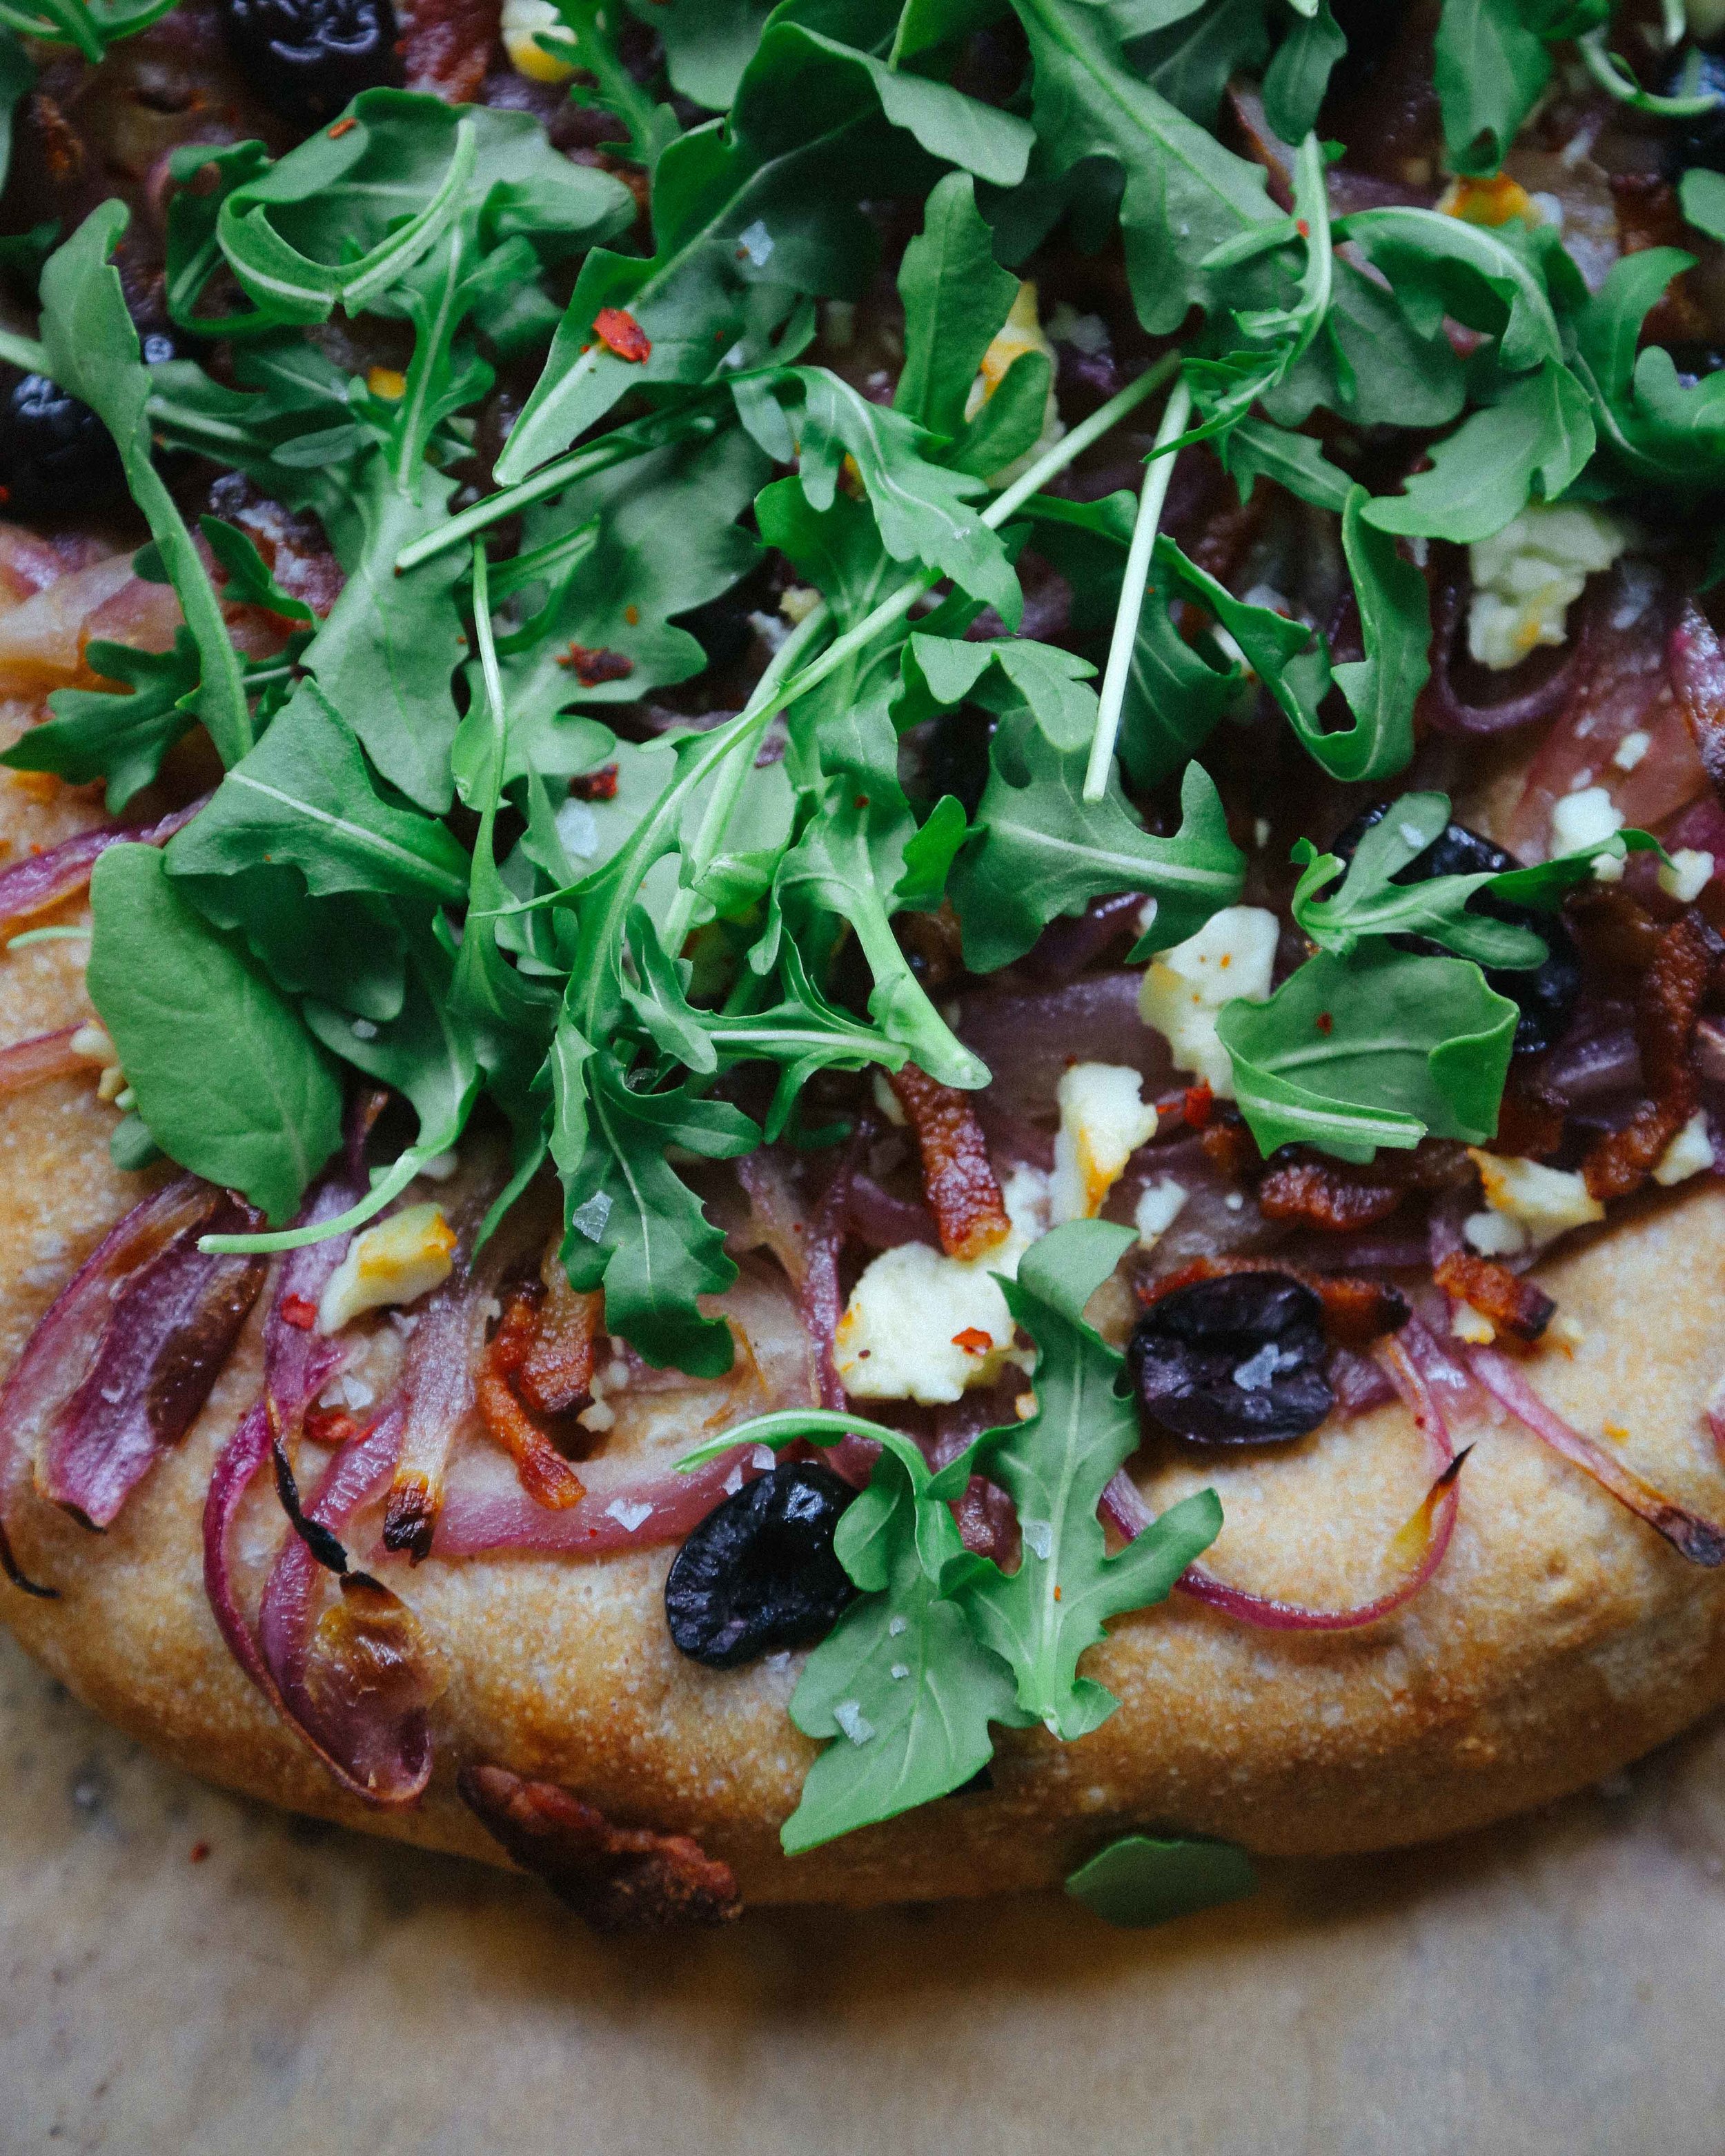
Place the dough on the parchment-lined baking sheet, and drizzle the dough with a little olive oil. Spread the onions over the dough, and scatter with the bacon and olives. Crumble the feta cheese over the bacon and olives. Gently press the toppings into the dough, just enough to help them stick to the surface while baking (not so much that the dough envelops them and they cannot be seen).

Bake at 425˚F until the dough is fully cooked and the onions at the edge of the dough are crisp and a little charred, about 20-25 minutes (check after 20 minutes). Remove from the oven and let cool for 5-10 minutes, then top with a couple of handfuls of arugula, and some generous pinches of flaky salt and Aleppo pepper flakes.

mujaddara, summer edition (with roasted tomatoes, goat cheese, basil, and lemon)

breakfast, dinner, lunch, main dishes, salads, summer, vegetarianFieldandForest1 Comment

What can I say about mujaddara...

If Mujaddara were a person, and I took him as my +1 to a party, he would not necessarily be the most attractive person there, or the tallest, or the most athletic, but he would be the snappiest dresser and get along with everyone and he would be an amazing dancer and he would tell the funniest jokes and everyone would be like, "oh, Mujaddara, you're so funny," and Mujaddara would be all "I know, right?" but not in a narcissistic way, because that's just not the kind of person Mujaddara is.

And, if this was your party, Mujaddara would also stay late to help you wash the dishes, and maybe drive the random dude that passed out on your carpet back to wherever he came from (which is likely across town because it is a law of the universe that a random dude will always pass out an inconveniently far distance from his house) and give him a box of saltines and a ginger ale from the stash that Mujaddara keeps in his car for just such occasions, because Mujaddara doesn't care who you are, he just wants you to feel great.

Mujaddara is pretty much the perfect addition to any party, and you would be happy to have met him. He would have helped you to have a great time, and you would invite him back in the future. And I would probably be in your good graces for bringing Mujaddara along in the first place.

Mujaddara
Serves 4-6 as a vegetarian main course, or 8-12 as a side dish

I like bringing things like Mujaddara to potlucks and collaborative dinner parties, because you just never know what's going to be at a potluck. I have been to a dinner potluck where every person (including me!) brought cheese and crackers. Let's not do that again! This dish will quickly serve as either a hearty side or vegetarian main dish, seamlessly filling any gap in your dinner party. Not to mention that it tastes fantastic at room temperature, making it the perfect dish for picnics or events where the official meal time is unclear. It's just the best!

Cooking notes: you can make this with any kind of rice or leftover rice, but jasmine has a really nice flavor for this dish. Cooking the jasmine rice with a glug of olive oil will help the grains remain separate, which means they can be more easily mixed with the lentils and onions.

2 cups cooked beluga lentils (about 1 cup uncooked)
2 cups cooked jasmine rice (about 1 cup uncooked)
2 medium yellow onions, caramelized (instructions below)
1 cup cooked greens (I sautéed some finely sliced kale leaves in olive oil and garlic), optional
salt, to taste
Lemon juice, to taste
1 pint mixed cherry, grape, and/or pear tomatoes, roasted (instructions below), and divided
1/3 cup chopped pistachios, divided
2 ounces soft goat cheese (I used chevre)
1/4 cup loosely packed basil leaves
Piment d'espelette or hot paprika, to taste (optional)

In a large bowl, combine the lentils, rice, caramelized onions, and greens. Add salt and lemon juice to taste, and mix gently using your hands (so you don't break the rice grains). This lentil/rice/onion combo is what is known as Mujaddara.

Add half of the roasted cherry tomatoes and half of the pistachios to the bowl, again mixing gently with your hands to combine. Transfer to a serving dish. At this point, you can cover and refrigerate the dish for up to 3 days. (The pistachios will soften a bit during this time, but the dish will still be very tasty.)

Just before serving, scatter the remaining roasted tomatoes and pistachios over the Mujaddara, then crumble the goat cheese over the tomatoes and pistachios. Finely chiffonade the basil leaves, and scatter them over the Mujaddara. Finish with a sprinkle of piment d'espelette or hot paprika for color and heat.

For basic caramelized onions: peel and halve the onions, and thinly slice from top to tail. Heat 1 tablespoon butter and 2 tablespoons olive oil in a cast iron or heavy-bottomed skillet over medium low heat, and add the onions, tossing to evenly coat them in the fat. Cook over medium low heat until their texture is meltingly soft, about 15-20 minutes. Once soft, sprinkle with a good pinch of kosher salt and crank up the heat to medium-high. Keep an eye on the onions and stir frequently, allowing them to brown and color. Once the onions are a deep amber in color, deglaze the pan with a little water (or white wine) to scrape up any tasty caramelized bits on the bottom of the pan. Let the water cook most of the way off (the onions may still look slightly wet), and transfer to a bowl to cool. The onions may be made up to a day in advance of making the Mujaddara.

For the roasted tomatoes: preheat the oven to 400˚F. Halve the tomatoes, and place in a single layer on a silpat or parchment paper lined baking sheet. Drizzle with a tablespoon of olive oil and gently toss with your hands to evenly coat. Roast for 15-20 minutes, or until the tomatoes are slightly wrinkled and reduced in size. Remove from the oven, and set aside to cool. The tomatoes are best roasted on the day that you plan to make the Mujaddara.

Other serving ideas: - top with chicken or steak kabobs for a heartier dinner - top with a fried egg, avocado, and hot sauce for breakfast or brunch (I do this with Mujaddara leftovers) - add roasted or grilled squash or replace the cooked greens with arugula (added just before serving).

(On an unrelated note, can we all agree that my friend Vanessa has the most amazing wine stopper you have ever seen?)

chiogga beet tart with ricotta, walnuts, and lemon thyme

autumn, breakfast, dinner, lunch, main dishes, spring, summer, vegetarianFieldandForest1 Comment
4j5a7882.jpg

I've rewritten this post a number of times. Each time has been a bit too verbose, a bit too flowery in waxing about the farmers' market, a bit too enthusiastic without really giving you the meat of the recipe. I mean, really. This is a tart. It's nothing we haven't seen before.

That said, this particular tart is a combination of one of Richard's favorite things, which is pie, and one of my favorite things, which is salad. I'm thinking "salad pie" sounds quite oxymoronic, not to mention sort of gross, so we'll keep calling this a vegetable tart. But really, the only reason why this tart is cooked at all once it is assembled is so that you can eat it hot. By all means, if your ingredients are still warm from cooking (or if you've cooked everything far in advance and are cool with eating your tart cold, salad style), you can feel free to fill up the tart shell with all of your goodies and immediately go to town.

Voila, veggie tart!

Chiogga Beet Tart with Ricotta, Walnuts, Caramelized Onions, and Lemon Thyme Makes 1 9-inch tart - Serves 6

Notes: A minimum 1-inch tall tart, quiche, or springform cake pan is recommended for this recipe to make sure your tart shell can hold all of the ingredients. Blind baking the shell is necessary as the ricotta is rather wet and the shell will not properly crisp in the oven if filled while unbaked. Be sure to read the instructions in full, as I gave them to you all mashed up together in the order in which I cook the various elements for the tart (I've emboldened the points at which various things are cooked, Joy of Cooking style, to try and clarify my process)! You can also always roast your beets, sauté your greens, and caramelize your onions ahead of time and then blind-bake your tart shell on the day you plan to bake your fully assembled tart.

3 pounds baby chiogga or yellow baby beets, with greens attached
olive oil
1 package all-butter puff pastry, such as Dufour, defrosted according to the package instructions (I'll often leave mine in the fridge overnight)
2 medium yellow onions, thinly sliced from top to tail
2 tablespoons butter
2 cloves garlic, minced
1/2 pound whole-milk ricotta cheese (basket ricotta is a good option, as it will be partially drained and less wet than normal ricotta)
1/2 cup coarsely chopped walnuts
2 sprigs lemon thyme or regular thyme, leaves removed from stems
kosher salt, to taste
flaky sea salt, such as Maldon, to taste

Preheat your oven to 400˚F.

Cut the greens away from the beets. Thoroughly wash both the beets and the beet greens, and set the greens aside. To roast the beets, place the beets on a large square of aluminum foil and drizzle with olive oil and sprinkle with a large pinch of kosher salt. Tightly wrap the foil around the beets, and place on a baking sheet to catch any juices that may leak. Roast in the oven for 30-40 minutes, until tender (I test this by piercing a beet with a paring knife).

While the beets are roasting, roughly chop the beet greens, and sauté them in a drizzle of olive oil in a heavy-bottomed pan or skillet over medium heat until they are wilted, but still quite bright green. Season with a pinch of salt, and remove from the heat, and set aside.

Wipe out the beet green pan, and place over medium-low heat to caramelize your onions. Melt the butter in the pan, and add the onions, stirring to coat them all in the fat. Cook, stirring occasionally, until the onions have softened and are translucent, about 15 minutes. Make a well in the center of your onions, add a drizzle of olive oil if the pan is dry, and add your minced garlic to the well. Let the garlic cook for 20-30 seconds, before mixing it into the onions. Add a large pinch of salt to the pan, increase the heat to medium-high, and cook, stirring occasionally, until the onions' color has reached a deep amber. Deglaze the pan with a little water to stir up any lovely caramelized bits on the bottom of your pan, cook for another 30 seconds or so, and remove the onions from the heat.

While the onions are cooking, check your beets. Once they are tender, remove the whole packet from the oven, and let them cool while still wrapped in the foil. Decrease the oven temperature to 375˚F for blind-baking your tart shell.

Flour a baking surface and roll out the puff pastry so that it can easily line a 9-inch x 1-inch tart or quiche pan. Drape the pastry over the pan, and press it into the bottom and sides of the pan. Use scissors or a bench scraper to cut the puff pastry just above the edge of the pan, so the pastry is slightly taller than the pan (it will shrink a little during blind baking, and this will help ensure that it doesn't end up too low in the pan). Place the lined pan on top of a baking sheet for easy maneuvering in and out of the oven.

Prick the bottom of the pastry all over with the tines of a fork. Line the inside of the pastry shell with a piece of parchment paper, and fill with pie weights or dried beans (this, plus the pricking, helps keep the puff pastry from puffing up during blind baking). Bake in your preheated oven for 25-30 minutes, or until the pastry is golden and crisp (start checking it at 20 minutes). Set aside.

Peel your cooked beets, and cut them into wedges. Lightly toss them in a little (1-2 teaspoons) of olive oil along with the lemon thyme.

To assemble your tart, spread the caramelized onions evenly over the bottom of the pastry shell. Spread the ricotta evenly over the onions, and top with the beet greens. Place the beets on top of the greens. Bake at 375˚F for 15-20 minutes, until the tart is hot. Remove from the oven and drizzle with a little more olive oil before sprinkling with a few good pinches of flaky salt. Let the tart sit for a couple of minutes before removing it from the pan and cutting into wedges. Serve hot, warm, or at room temperature.